Nextcloud Step by Step
Reworking
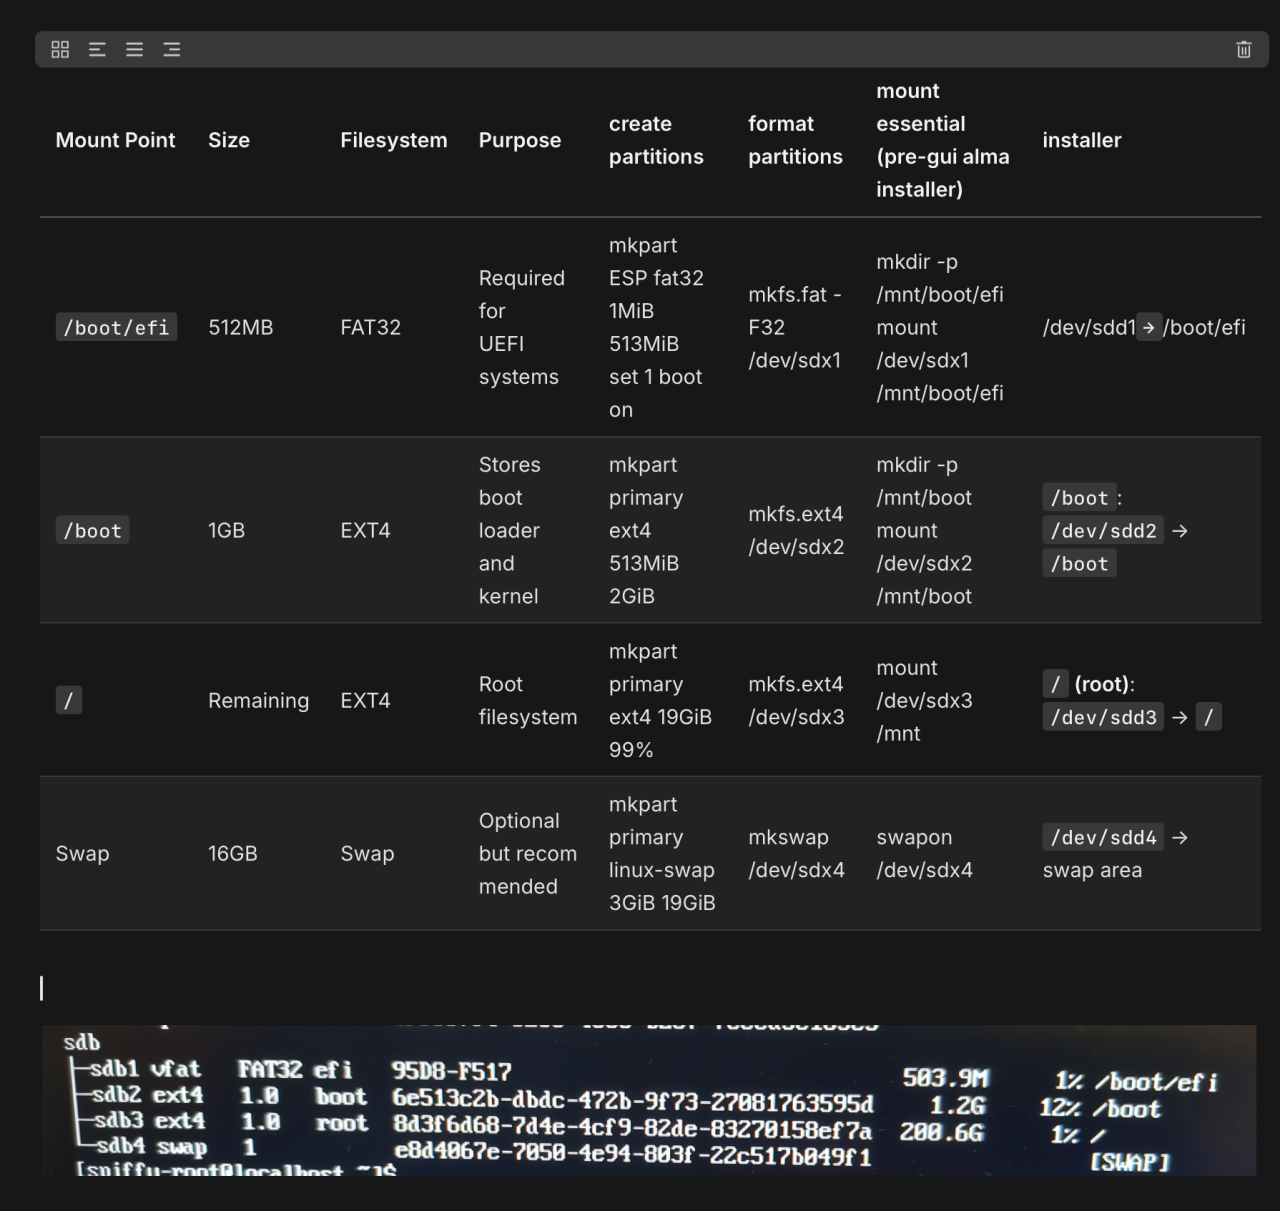
# Wipe Disk
sudo dd if=/dev/zero of=/dev/sdX bs=1M status=progress

#Parted
parted /dev/sdx (replace x with correct drive)

#Set partition table
mklabel gpt

# Create and format partitions (assuming disk is /dev/sdX, adjust accordingly)
parted /dev/sdX mklabel gpt
parted /dev/sdX mkpart primary fat32 1MiB 513MiB
parted /dev/sdX set 1 boot on
mkfs.fat -F32 /dev/sdX1

parted /dev/sdX mkpart primary ext4 513MiB 2GiB
mkfs.ext4 /dev/sdX2

parted /dev/sdX mkpart primary ext4 2GiB 100%
mkfs.ext4 /dev/sdX3

parted /dev/sdX mkpart primary linux-swap 100% 116GiB
mkswap /dev/sdX4
swapon /dev/sdX4

# Mount partitions
mkdir -p /mnt/boot/efi
mount /dev/sdX1 /mnt/boot/efi

mkdir -p /mnt/boot
mount /dev/sdX2 /mnt/boot

mount /dev/sdX3 /mnt
Install AlmaLinux
- Boot into the AlmaLinux installer and ensure the partitions and mount points match exactly.
1. Remove Existing Installations
- Your command list for cleanup is comprehensive. Run these to completely remove the old setup:
sudo systemctl stop mariadb httpd
sudo dnf remove -y mariadb-server httpd php*
sudo rm -rf /var/lib/mysql /var/www/html/nextcloud /var/www/html/dbtest.php
sudo rm -rf /etc/my.cnf /etc/my.cnf.d
- Verify Clean State:
ls -ld /var/lib/mysql /var/www/html
2. SELinux and /tmp
- Since SELinux is already disabled, verify it remains disabled before proceeding:
sestatus

# if still enabled
#sudo setenforce 0
#sudo nano /etc/selinux/config
#SELINUX=disabled
#then REBOOT!!!
- Ensure
/tmppermissions:
ls -ld /tmp
sudo chmod 1777 /tmp
sudo chown root:root /tmp
3. Install Essential Packages
Install the base system packages and PHP modules. Install these before configuring anything:
sudo dnf install -y mariadb-server httpd php \
php-ctype php-curl php-dom php-fileinfo php-filter php-gd php-hash php-json php-libxml \
php-mbstring php-openssl php-posix php-session php-simplexml php-xmlreader php-xmlwriter \
php-zip php-zlib php-pdo php-pdo_mysql
4. Update PHP
Set the PHP version before starting Apache or MariaDB:
sudo dnf install -y epel-release
sudo dnf install -y https://rpms.remirepo.net/enterprise/remi-release-9.rpm
sudo dnf module reset php -y
sudo dnf module enable php:8.1 -y
sudo systemctl restart httpd
Verify PHP setup:
php -v
php -m
- After Base System Setup: Once you’ve installed the base packages (like
mariadb-server,httpd), confirm the base system is functional and updated:
sudo dnf update -y
- Set the PHP Version Immediately: Before touching MariaDB or downloading Nextcloud, install the compatible PHP version and extensions:
sudo dnf install -y epel-release
sudo dnf install -y https://rpms.remirepo.net/enterprise/remi-release-9.rpm
sudo dnf module reset php -y
sudo dnf module enable php:8.1 -y
sudo dnf install -y php php-mysqlnd php-gd php-mbstring php-intl php-xml php-zip
sudo systemctl restart httpd
-
. Install Recommended Modules**
For enhanced performance and compatibility:
sudo dnf install -y php-intl php-sodium php-ldap php-smbclient php-ftp php-imap php-bcmath php-gmp php-exif
sudo dnf install -y php-apcu php-memcached php-redis
sudo dnf install -y php-imagick ffmpeg php-pcntl php-phar
If there are issues with PDF previews:
Adjust the ImageMagick policy file:
sudo nano /etc/ImageMagick-*/policy.xml
Find and comment out or adjust:
<policy domain="coder" rights="none" pattern="PDF" />
12. Update php.ini for Optimal Settings
Edit the PHP configuration file(s):
sudo nano /etc/php.ini
Ensure these settings are updated:
memory_limit = 512M
max_execution_time = 3600
opcache.enable = 1
opcache.interned_strings_buffer = 16
opcache.max_accelerated_files = 10000
opcache.memory_consumption = 128
opcache.save_comments = 1
opcache.revalidate_freq = 1
upload_tmp_dir = /var/www/html/nextcloud/data/tmp
13. Validate Installed Modules
Run the following command to confirm all required modules are installed:
php -m | grep -E 'ctype|curl|dom|fileinfo|filter|gd|hash|json|libxml|mbstring|openssl|posix|session|simplexml|xmlreader|xmlwriter|zip|zlib|pdo|pdo_mysql|intl|sodium'
This ensures all modules Nextcloud needs are available.
- Test PHP Configuration: Create a PHP info file to confirm the correct version and required extensions:
echo "<?php phpinfo(); ?>" | sudo tee /var/www/html/info.php
Open the file in a browser (e.g., http://<server-ip>/info.php) and check the PHP version and loaded extensions.
- Verify
php -v
php -m
-
make the new directories
sudo mkdir /var/www/html/nextcloud/data sudo mkdir /var/www/html/nextcloud/data/tmp #upload_tmp_dir = /var/www/html/nextcloud/data/tmp - this is in the config file but would not exist yet? # do permission only if asked to #sudo chown -R apache:apache /var/www/html/nextcloud/data #sudo chmod 750 /var/www/html/nextcloud/data -
I WANT TO CHECK on what the permissions are for our prblems
ls -ld /var/www/html
ls -ld /var/www/html/nextcloud
ls -ld /var/www/html/nextcloud
ls -ld /var/lib/mysql
ls -ld /var/www/html/nextcloud/data/tmp
5. Set Up MariaDB**
Initialize MariaDB with secure settings:
sudo mysql_secure_installation
Log in as root:
mysql -u root -p
Create a new database and user:
CREATE DATABASE nxtclouddb2 CHARACTER SET utf8mb4 COLLATE utf8mb4_general_ci;
CREATE USER 'nxtcldusr2'@'localhost' IDENTIFIED BY 'H0m02smp3fag';
GRANT ALL PRIVILEGES ON nxtclouddb2.* TO 'nxtcldusr2'@'localhost';
FLUSH PRIVILEGES;
Test access:
mysql -u nxtcldusr2 -p
USE nxtclouddb2;
SHOW TABLES;
get and extract nextcloud
cd /tmp
wget https://download.nextcloud.com/server/releases/latest.tar.bz2
tar -xjf latest.tar.bz2 -C /var/www/html/

#permissions only if asked
#sudo chown -R apache:apache /var/www/html/nextcloud
#sudo chmod -R 750 /var/www/html/nextcloud
this is the nextcloud/config/config
$CONFIG = array (
  'passwordsalt' => 'IBBzJ7Go086CPa41aS+YtGtICaQcu3',
  'secret' => 'QP/z7OgA577Z9F8lpImyHqCPCz1FK9urlekwKG6L7UYnSkrp',
  'trusted_domains' =>
  array (
    0 => 'localhost',
  ),
  'datadirectory' => '/var/www/html/nextcloud/data',
  'dbtype' => 'mysql',
  'version' => '30.0.4.1',
  'overwrite.cli.url' => 'http://localhost',
  'dbname' => 'nxtclouddb2',
  'dbhost' => 'localhost',
  'dbport' => '',
  'dbtableprefix' => 'oc_',
);
Run the installer:
sudo -u apache php /var/www/html/nextcloud/occ maintenance:install \
  --database "mysql" \
  --database-name "nxtclouddb2" \
  --database-user "nxtcldusr2" \
  --database-pass "H0m02smp3fag" \
  --admin-user "spiffy" \
  --admin-pass "H0m0-smp-fag"
re-check the nextcloud/config/config
sudo nano /var/www/html/nextcloud/config/config?.whatever
7. Logs and Troubleshooting
-
Monitor these logs closely:
- Apache Logs:
/var/log/httpd/error_log - MariaDB Logs:
/var/log/mariadb/mariadb.log - Nextcloud Logs:
/var/www/html/nextcloud/data/nextcloud.log
- Apache Logs:
Use tail for live monitoring:
sudo tail -f /var/log/httpd/error_log
sudo tail -f /var/www/html/nextcloud/data/nextcloud.log
Notes:
- Firewall Rules: Only apply them once everything else works.
- Testing PHP: Ensure no missing modules before touching the Nextcloud installer.
- Data Directory: Verify
/var/www/html/nextcloud/dataexists after extraction.
Partitioning and Filesystem Setup
# Wipe Disk
sudo dd if=/dev/zero of=/dev/sdX bs=1M status=progress

#Parted
parted /dev/sdx (replace x with correct drive)

#Set partition table
mklabel gpt

# Create and format partitions (assuming disk is /dev/sdX, adjust accordingly)
parted /dev/sdX mklabel gpt
parted /dev/sdX mkpart primary fat32 1MiB 513MiB
parted /dev/sdX set 1 boot on
mkfs.fat -F32 /dev/sdX1

parted /dev/sdX mkpart primary ext4 513MiB 2GiB
mkfs.ext4 /dev/sdX2

parted /dev/sdX mkpart primary ext4 2GiB 100%
mkfs.ext4 /dev/sdX3

parted /dev/sdX mkpart primary linux-swap 100% 116GiB
mkswap /dev/sdX4
swapon /dev/sdX4

# Mount partitions
mkdir -p /mnt/boot/efi
mount /dev/sdX1 /mnt/boot/efi

mkdir -p /mnt/boot
mount /dev/sdX2 /mnt/boot

mount /dev/sdX3 /mnt
Install AlmaLinux
- Boot into the AlmaLinux installer and ensure the partitions and mount points match exactly.
Post-Installation Updates
# Update and install essential packages
sudo dnf update -y
sudo dnf install -y vim nano wget curl git htop net-tools epel-release
sudo dnf install httpd mariadb-server php php-mysqlnd php-dom php-gd php-intl php-mbstring php-xml php-zip unzip -y

# Enable and start services
sudo systemctl enable --now httpd mariadb
sudo systemctl start httpd mariadb

# Configure firewall
sudo systemctl enable firewalld
sudo systemctl start firewalld
sudo firewall-cmd --add-service=http --permanent
sudo firewall-cmd --add-service=https --permanent
sudo firewall-cmd --reload

# Add a user
sudo adduser yourusername
sudo passwd yourusername
sudo usermod -aG wheel yourusername
Nextcloud Installation
# Download and extract Nextcloud
wget https://download.nextcloud.com/server/releases/latest.tar.bz2
tar -xjf latest.tar.bz2 -C /var/www/html/

# Set permissions
sudo chown -R apache:apache /var/www/html/nextcloud
sudo chmod -R 755 /var/www/html/nextcloud

# Restart Apache
sudo systemctl restart httpd
MariaDB Configuration
# Secure MariaDB installation
sudo mysql_secure_installation

# Create Nextcloud database and user
sudo mysql -u root -p
CREATE DATABASE nextcloud;
CREATE USER 'nxtcloudspiffy'@'localhost' IDENTIFIED BY 'password';
GRANT ALL PRIVILEGES ON nextcloud.* TO 'nxtcloudspiffy'@'localhost';
FLUSH PRIVILEGES;
EXIT;
Testing Nextcloud
-
Access Nextcloud in the browser (
http://your-ip/nextcloud). -
Enter the database credentials:
- Database User:
nxtcloudspiffy - Database Password:
password - Database Name:
nextcloud - Host:
localhost
- Database User:
-
NEXT PostInstallUpdates
-
sudo dnf update -y
-
sudo dnf install -y vim nano wget curl git htop net-tools epel-release
-
sudo dnf install httpd mariadb-server php php-mysqlnd php-dom php-gd php-intl php-mbstring php-xml php-zip unzip -y
-
sudo systemctl enable –now httpd
-
sudo dnf install php php-mysqlnd php-dom php-gd php-intl php-mbstring php-xml php-zip php-cli php-json php-pdo -y
-
sudo dnf install tar bzip2 unzip -y
-
sudo dnf groupinstall -y "Development Tools"
-
ip addr show
-
sudo systemctl enable firewalld
sudo systemctl start firewalld
sudo firewall-cmd –add-service=http –permanent
sudo firewall-cmd –add-service=https –permanent
sudo firewall-cmd –permanent –add-service=ssh
sudo firewall-cmd –reloadcheck rules: sudo firewall-cmd –list-all
ssh specific port: sudo firewall-cmd –permanent –add-port=2222/tcp -
sudo adduser yourusername
sudo passwd yourusername
sudo usermod -aG wheel yourusername -
sudo swapon /dev/sdX
-
swapon –show
-
sudo dnf install openssh-server -y
-
sudo systemctl status sshd
-
sudo firewall-cmd –permanent –add-service=ssh
sudo firewall-cmd –reload -
Download and Configure Nextcloud:
-
Download: wget https://download.nextcloud.com/server/releases/latest.tar.bz2
- Extract: tar -xjf latest.tar.bz2 -C /var/www/html/
- Set Permissions:sudo chown -R apache:apache /var/www/html/nextcloud
sudo chmod -R 755 /var/www/html/nextcloud - Enable Apache modules:sudo systemctl enable –now httpd
sudo systemctl restart httpd
DISABLE SELIUX:sudo nano /etc/selinux/config
SELINUX=disabled
-
- What else does ti need to start?
- no keys for ssh
- no failtoban
- no automatic updates
- no disable root access
- no