QUICKSTARTS: https://cloud.google.com/resource-manager/docs/quickstarts
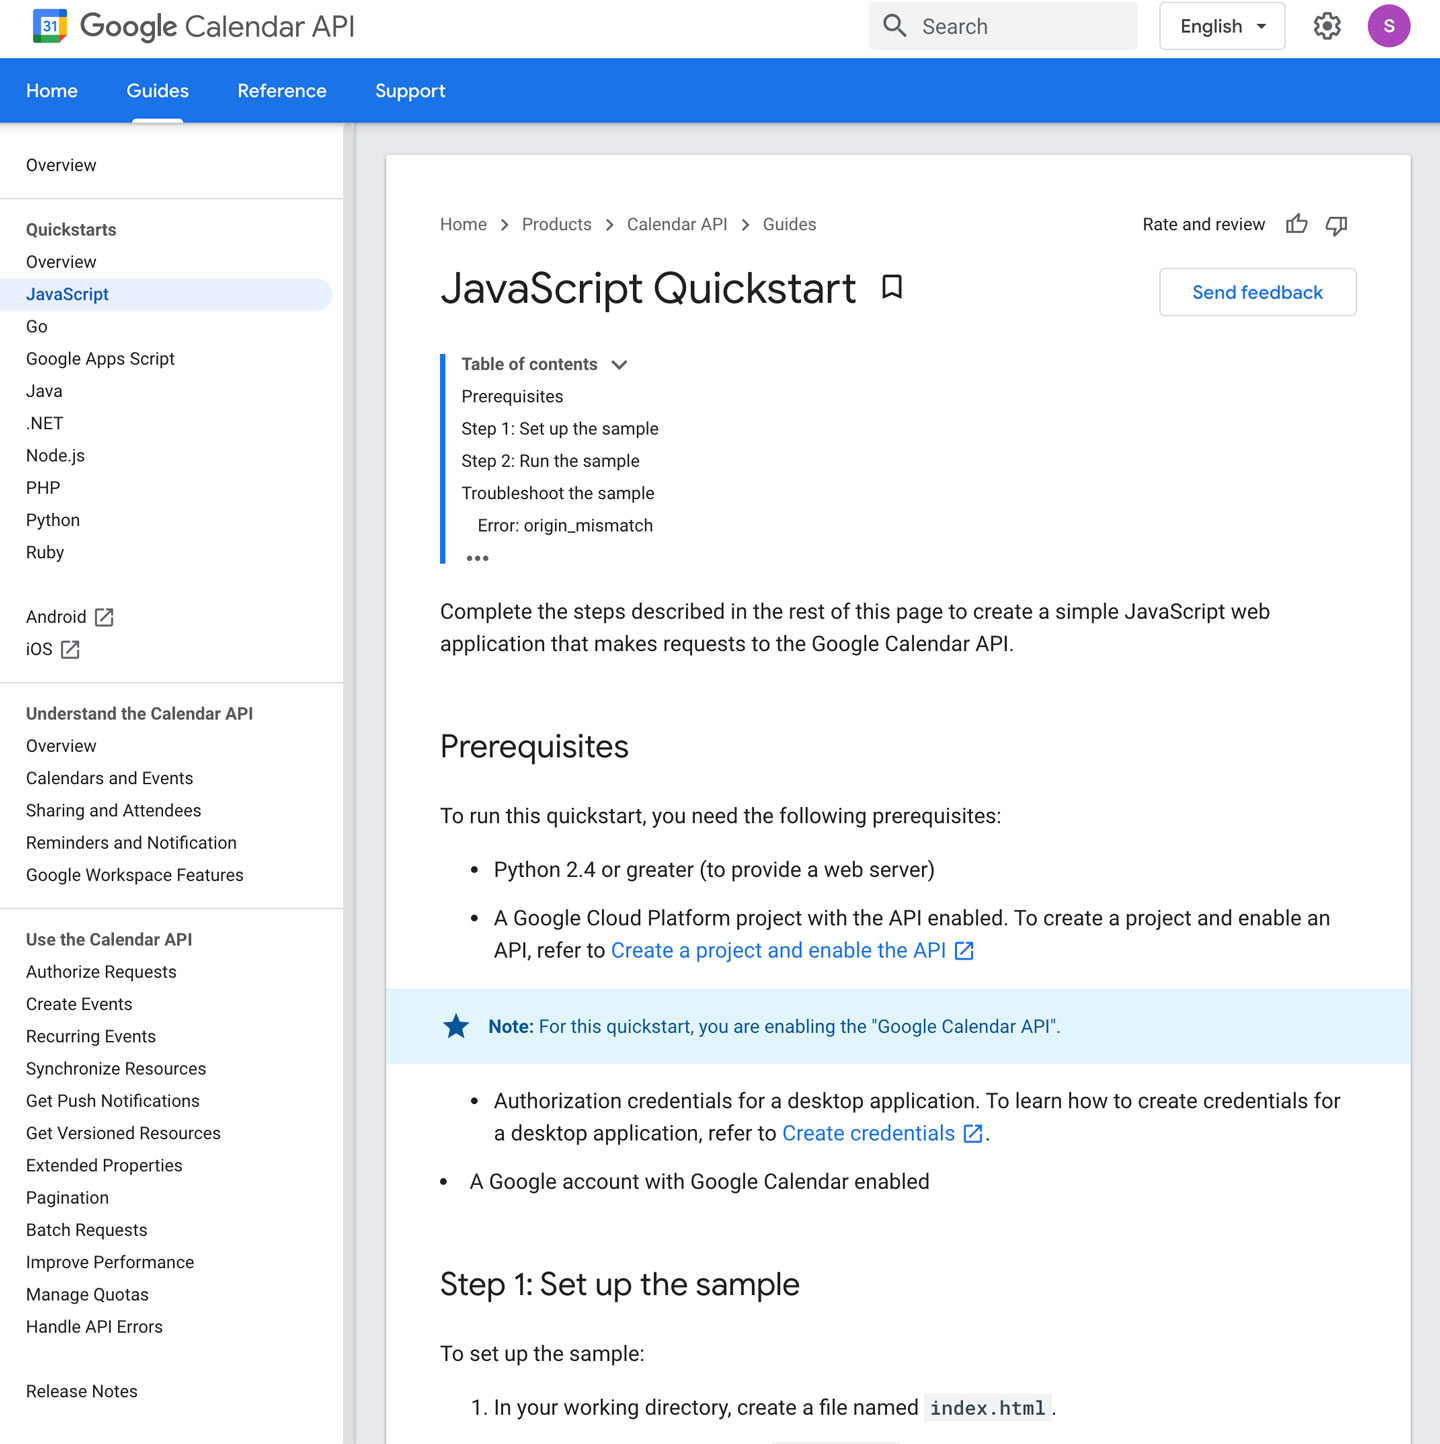
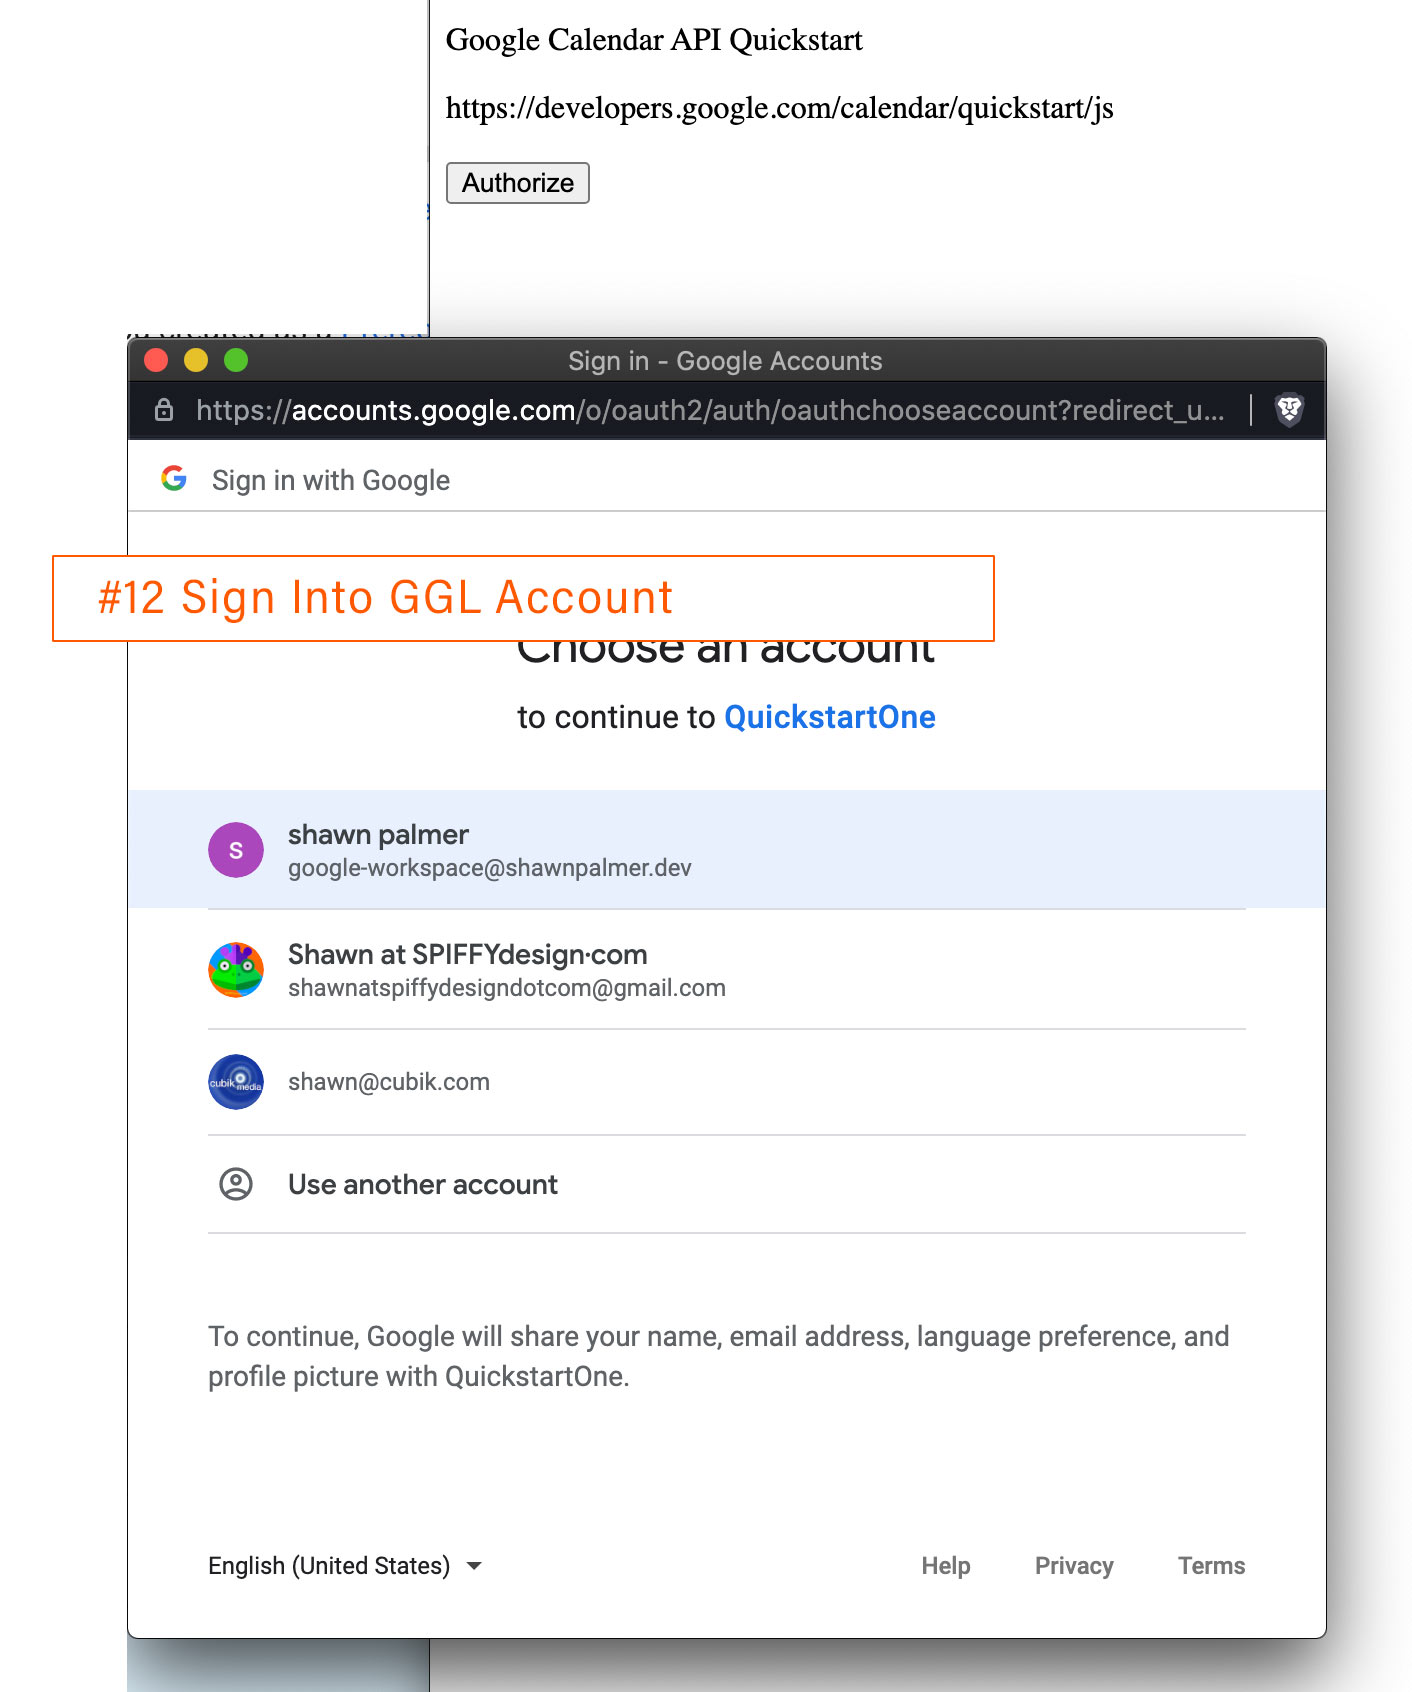
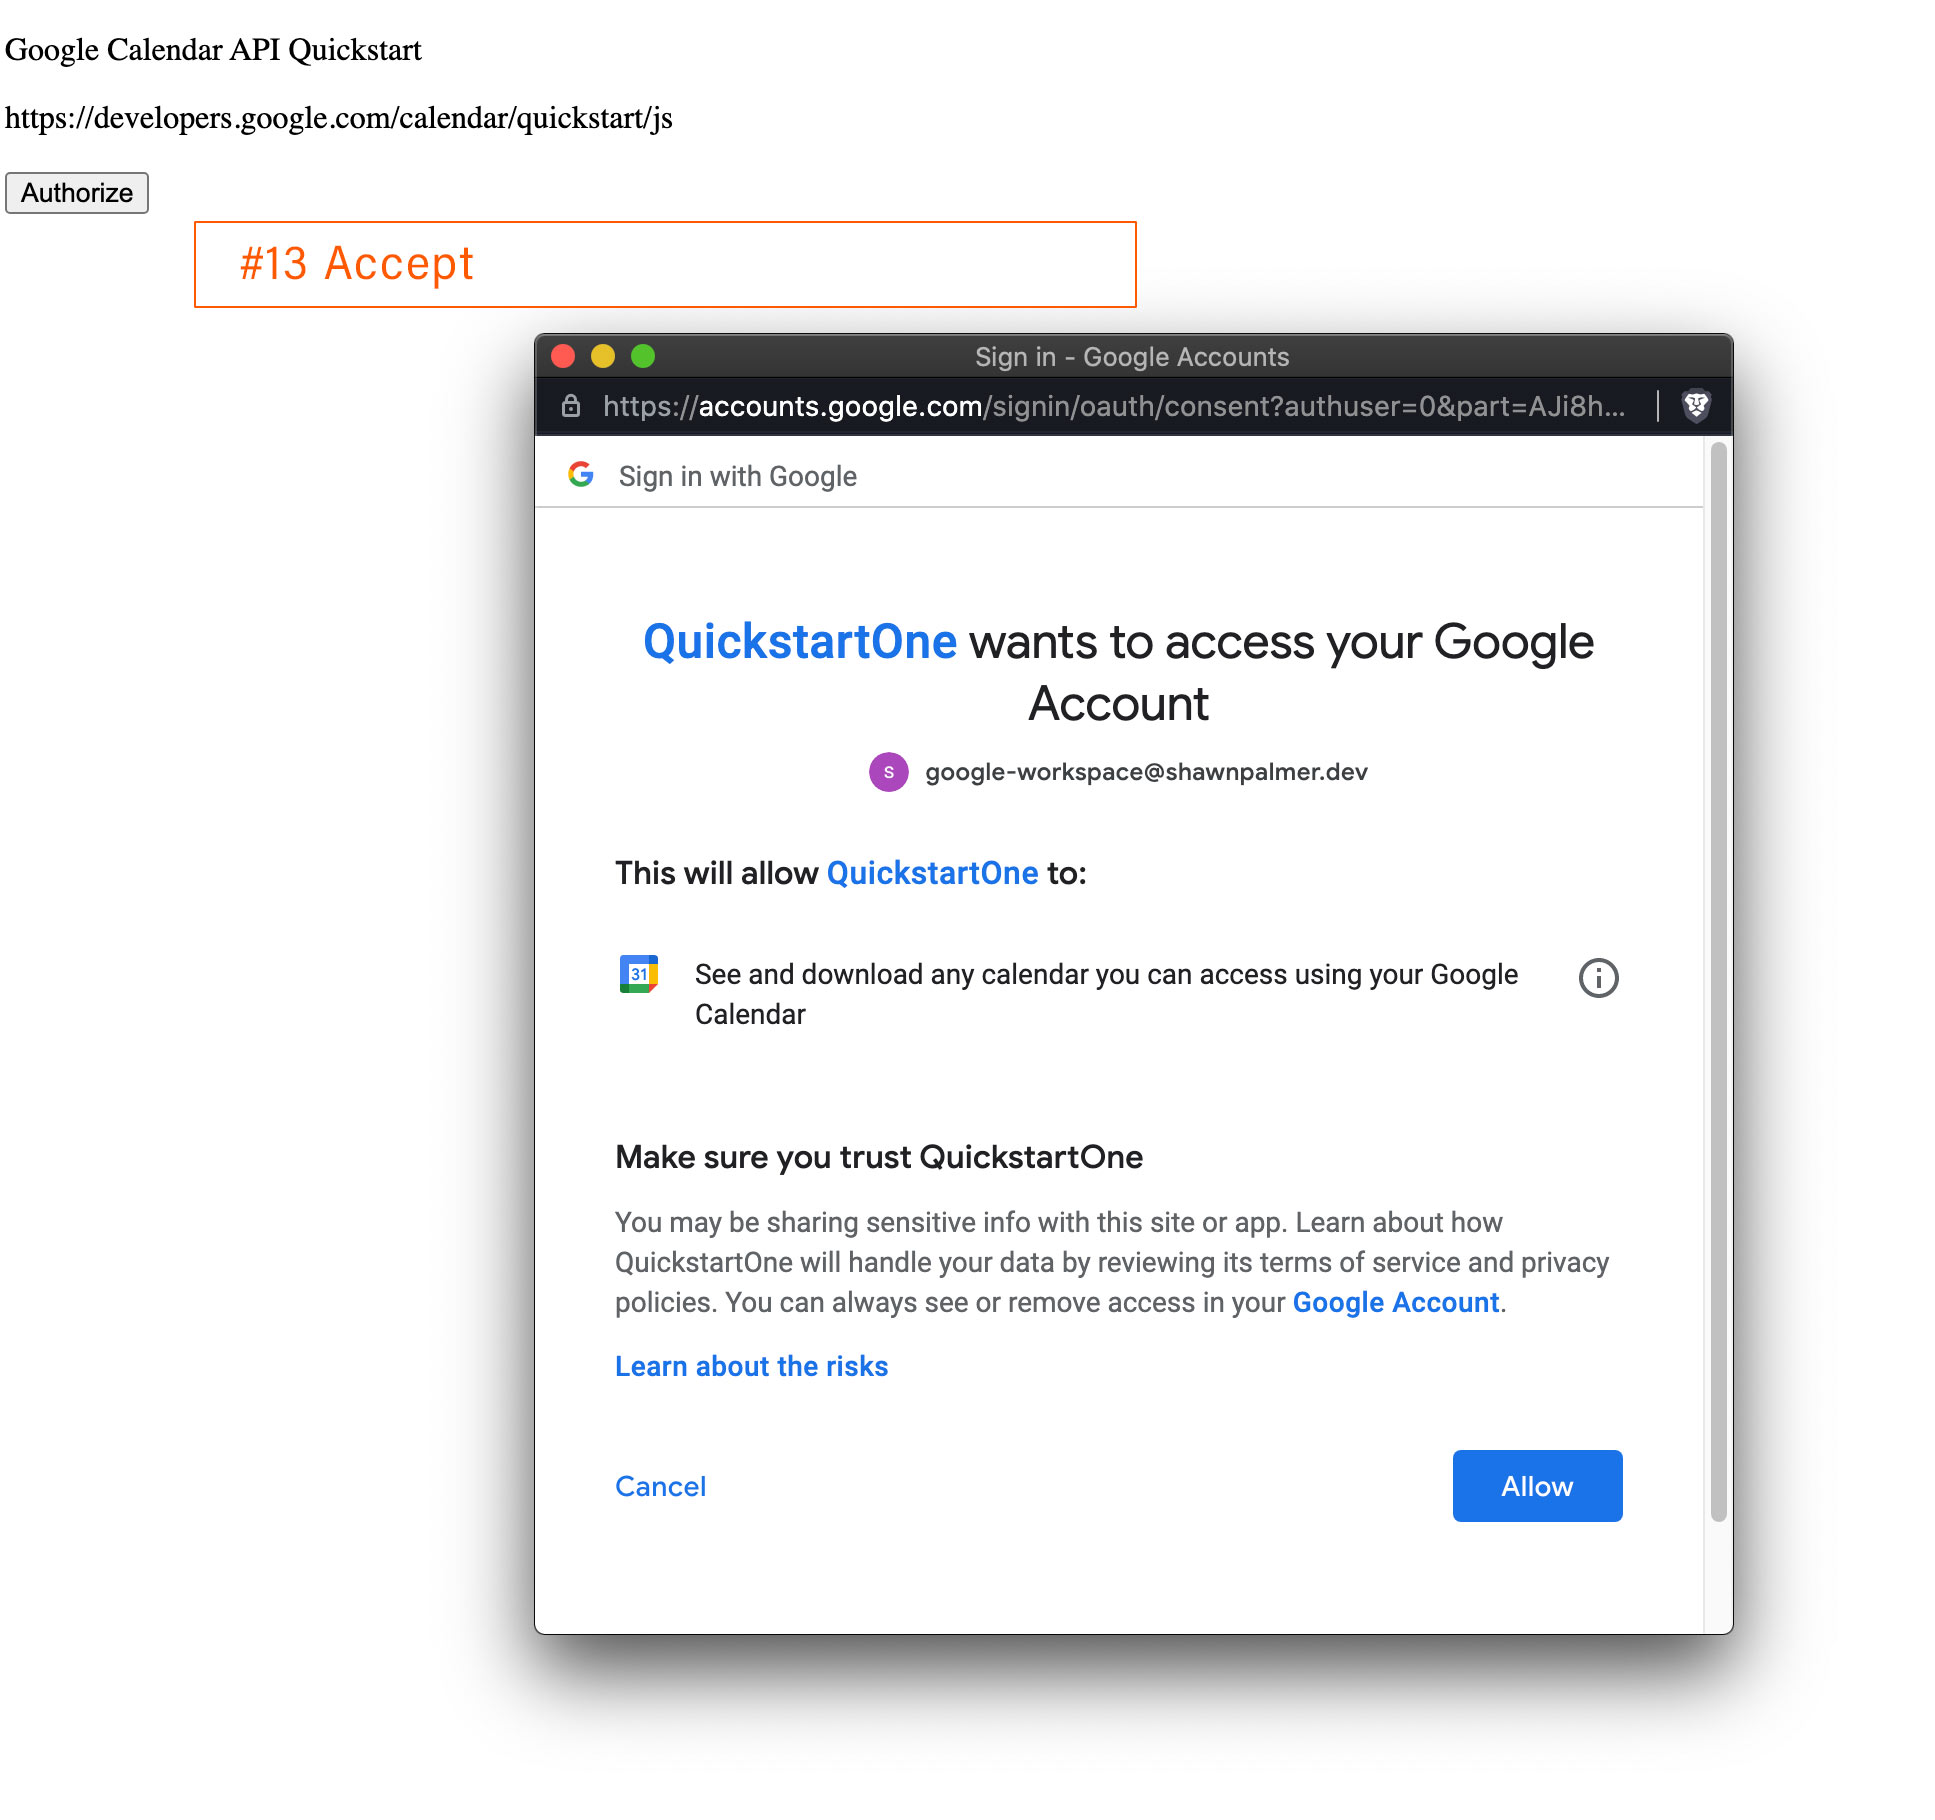
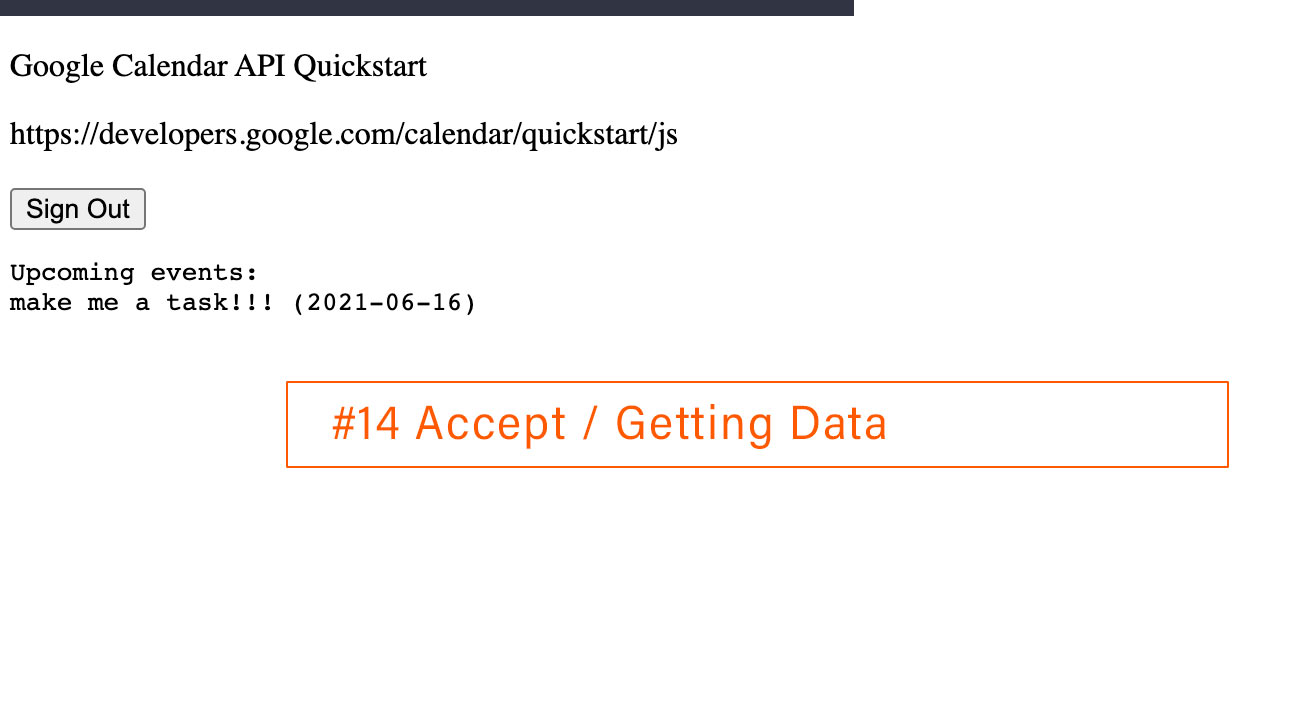
Javascript QuickStart: https://developers.google.com/calendar/quickstart/jsCREATE PROJECT ENABLE API: https://developers.google.com/workspace/guides/create-project
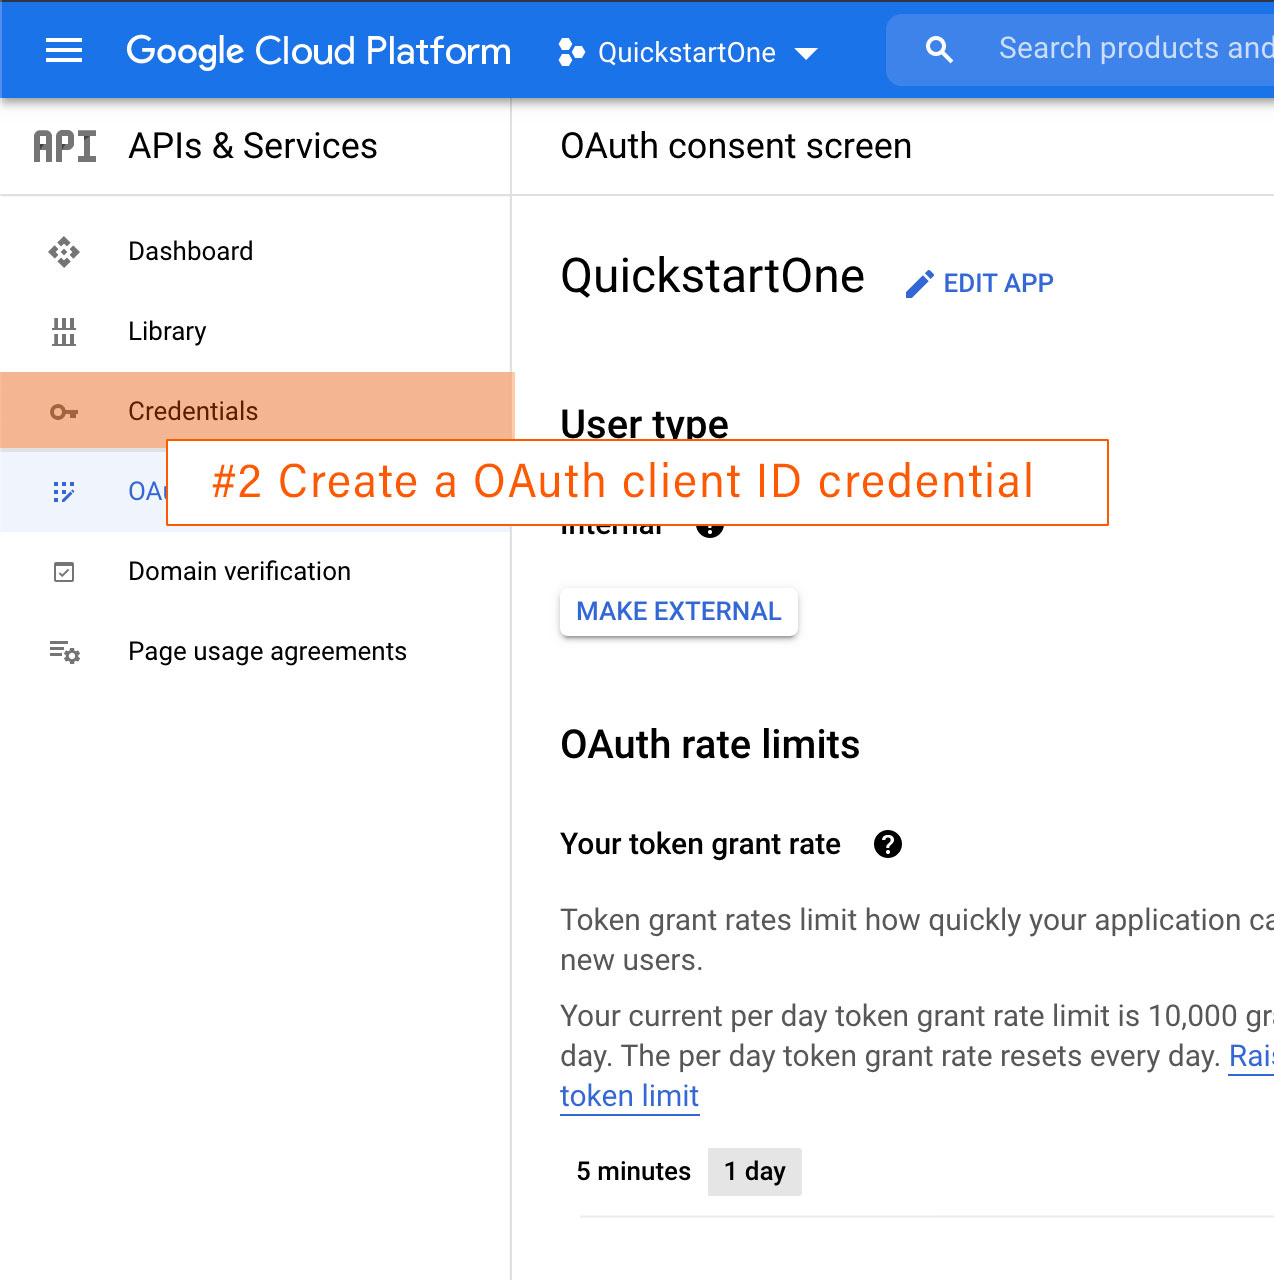
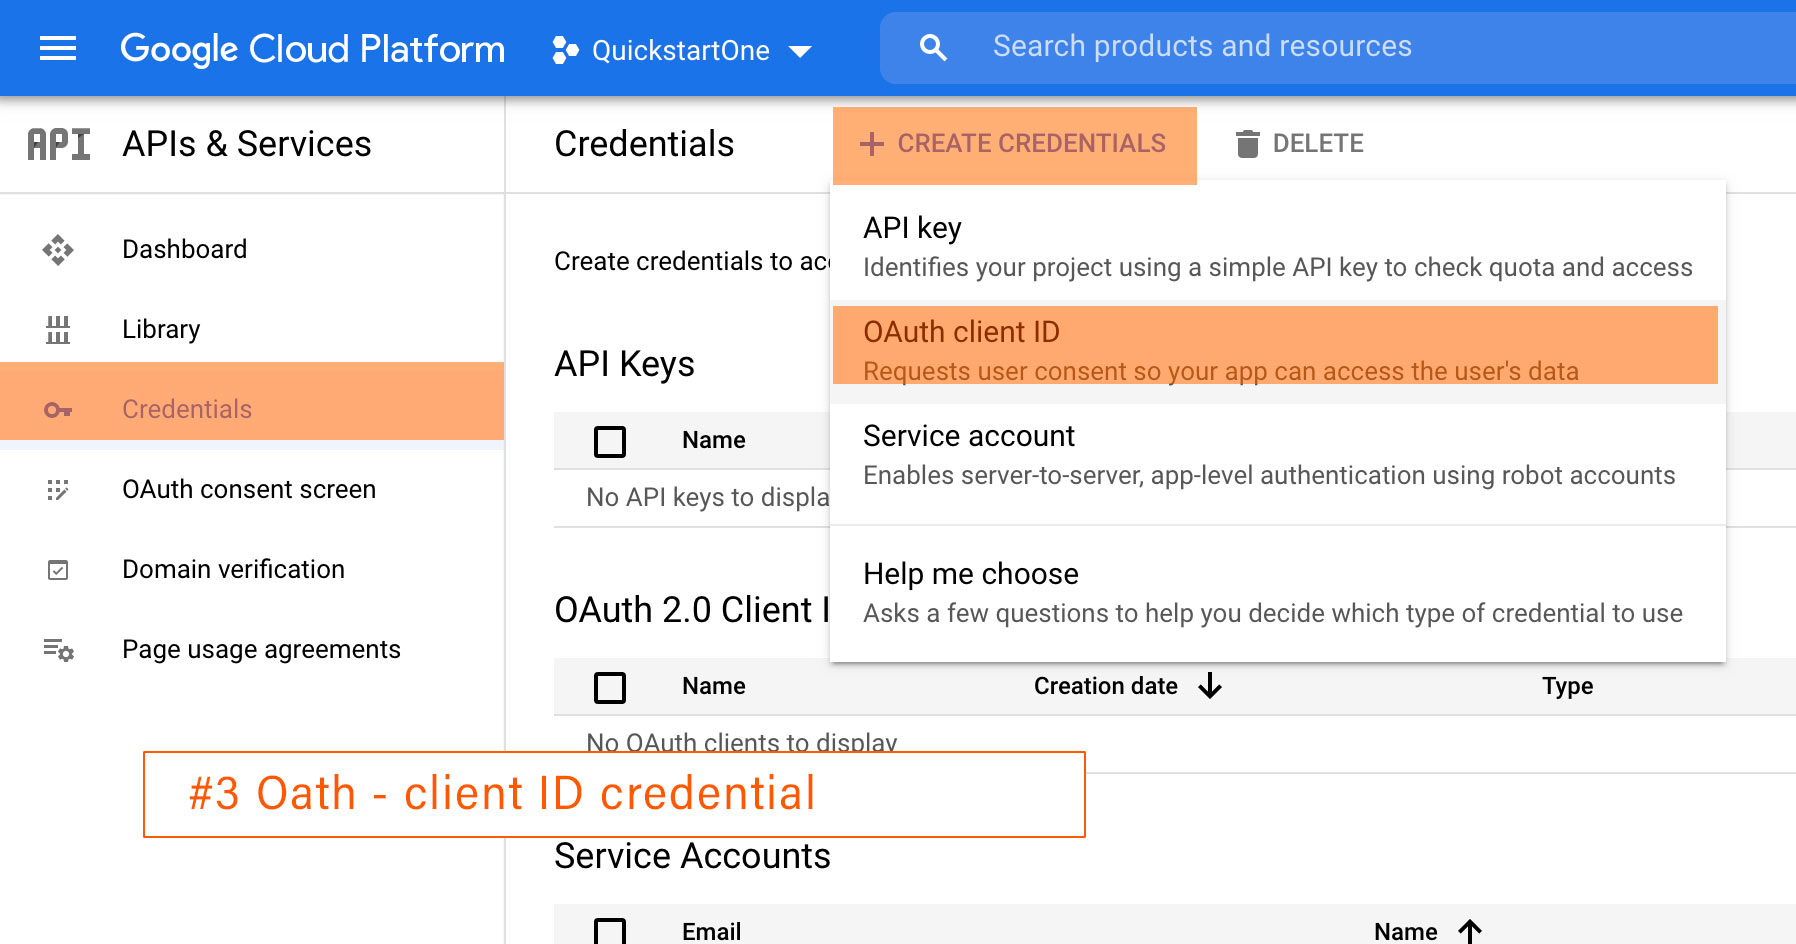
CREATE CREDENTIALS: https://developers.google.com/workspace/guides/create-credentials

GITHUB: https://github.com/google/google-api-javascript-client
ADDITIONAL INFO::: CREATE AN ACCOUNT WITH DOMAIN WIDE CREDENTIALS: https://developers.google.com/workspace/guides/create-credentials#createsvc
GGL Calendar

- In this document, continue with the documentation that corresponds to your app type:
- Create Web application credentials (client-side JavaScript). Use to this section for the JavaScript quickstart.
- Create Web application credentials (web server app).
- Create Desktop application credentials. Use this section for non-JavaScript quickstarts.
- Create Chrome app credentials.
- Create Android application credentials.
- Create iOS application credentials.
- Create TVs and limited input device credentials.
- Create Universal Windows Platform (UWP) credentials.
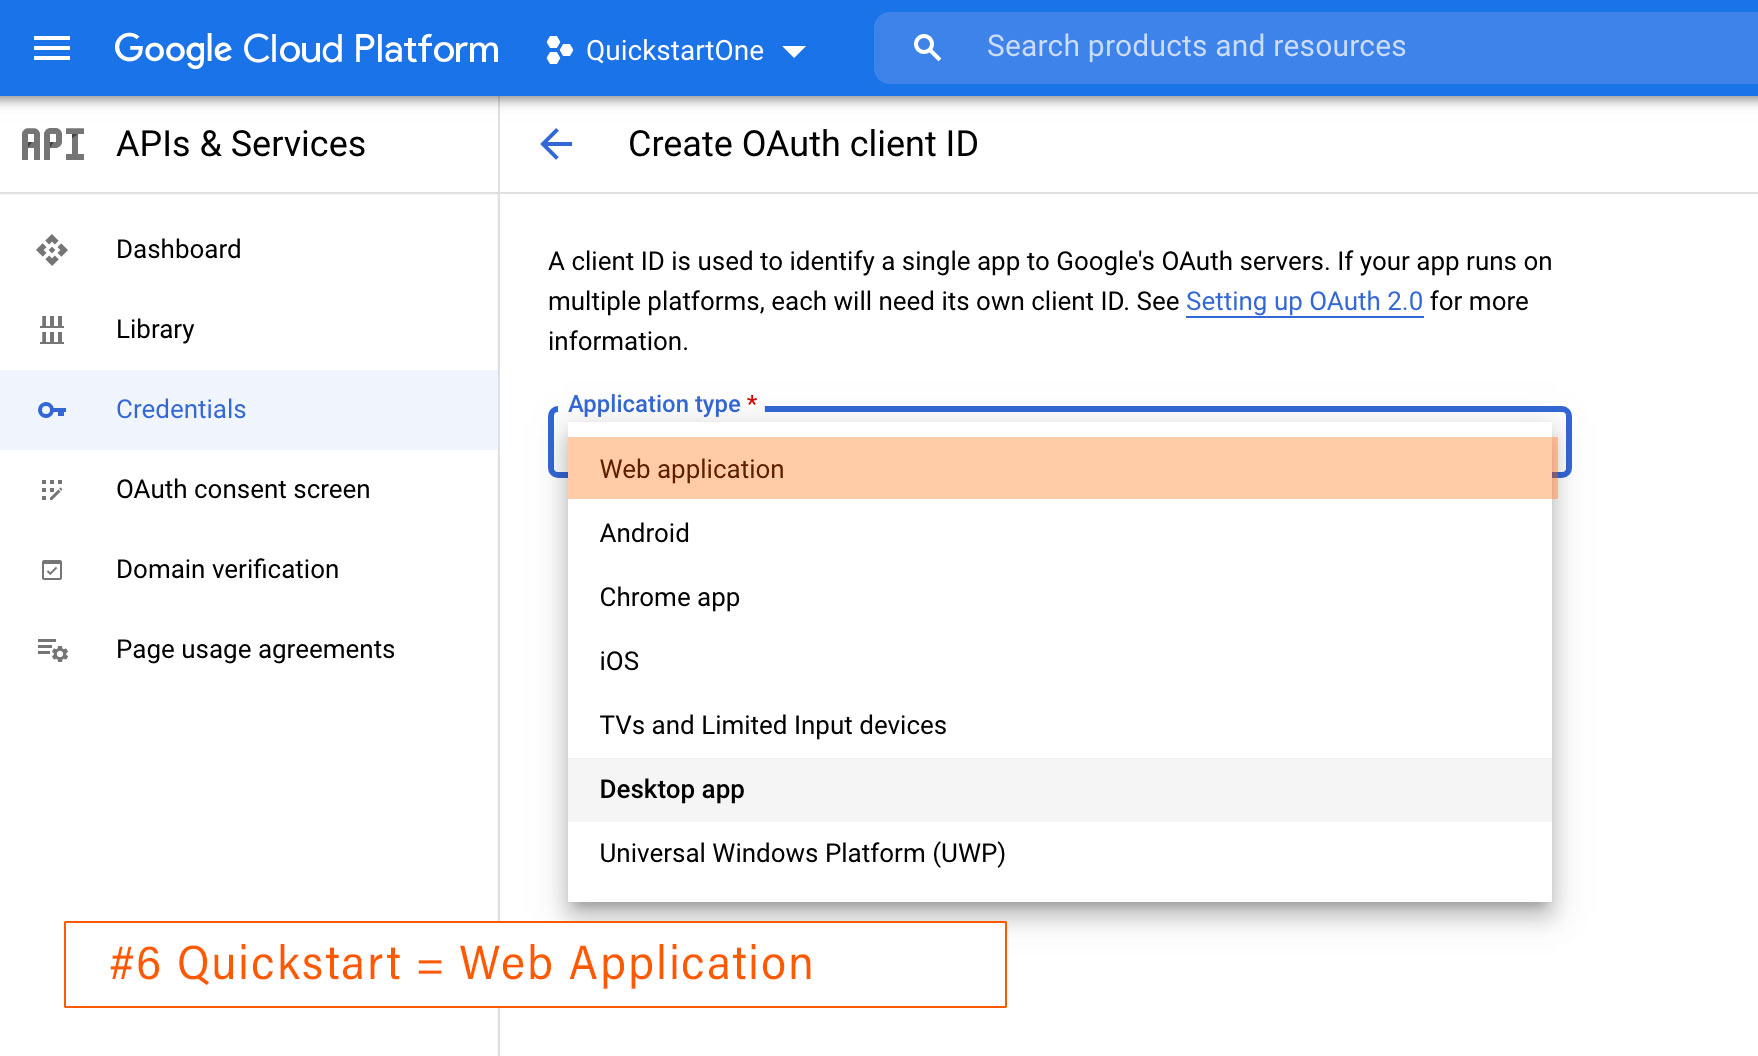

Create Web application credentials (client-side JavaScript)
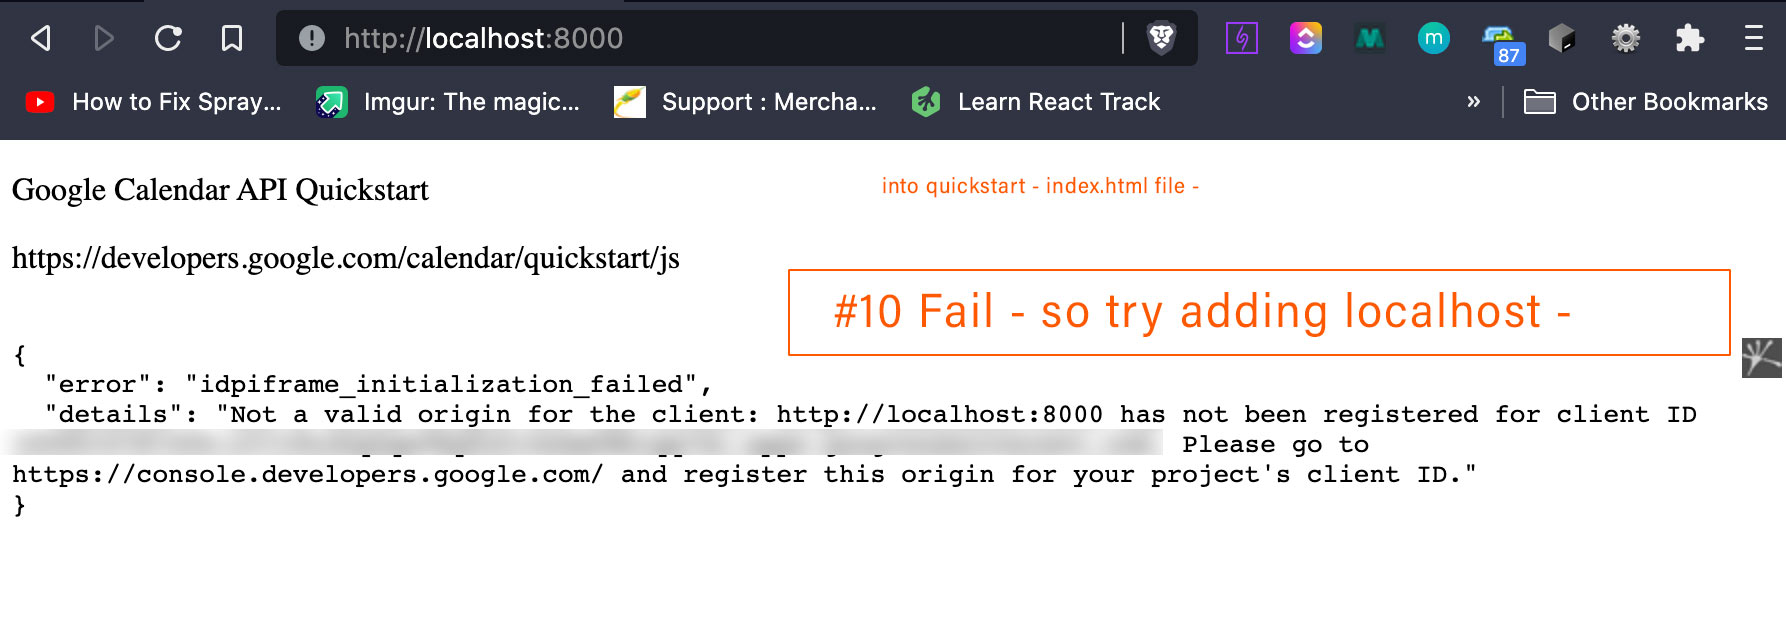
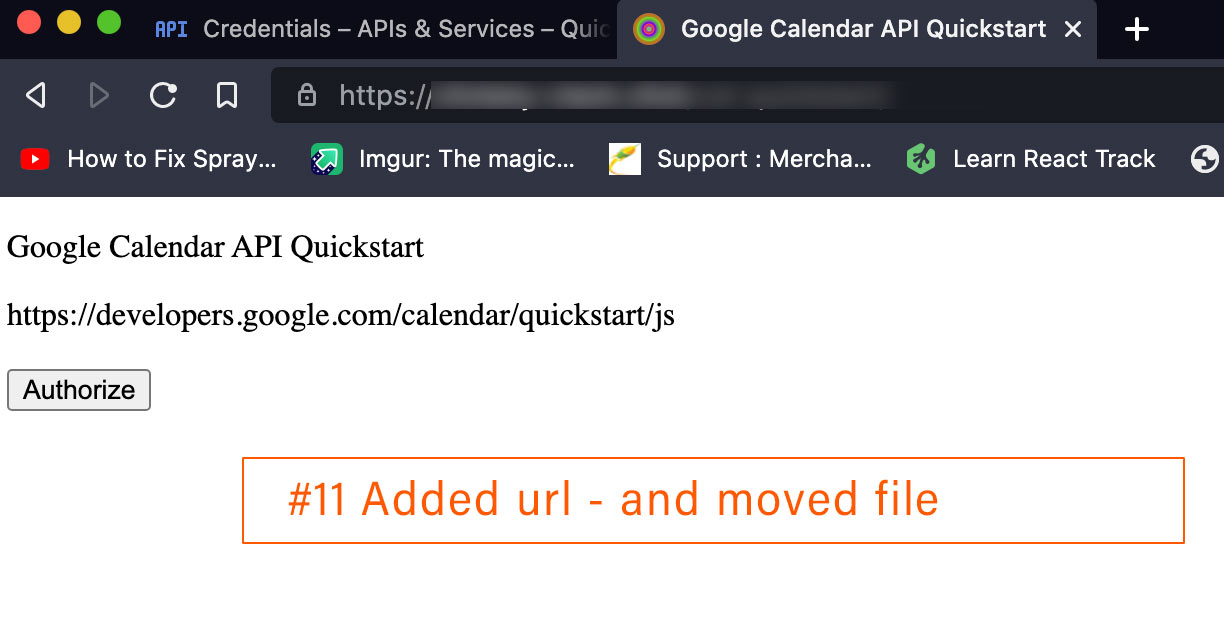
If you’re creating Web application credentials for a client-side JavaScript app, follow these steps :- Specify authorized JavaScript origins. Under Authorized JavaScript origins, click Add URI and type a URI in the URIs field for use with requests from a browser. The origins identify the domains from which your application can send API requests to the OAuth 2.0 server.
- Click Create. The OAuth client created screen appears. This screen shows the Client ID and Client secret.
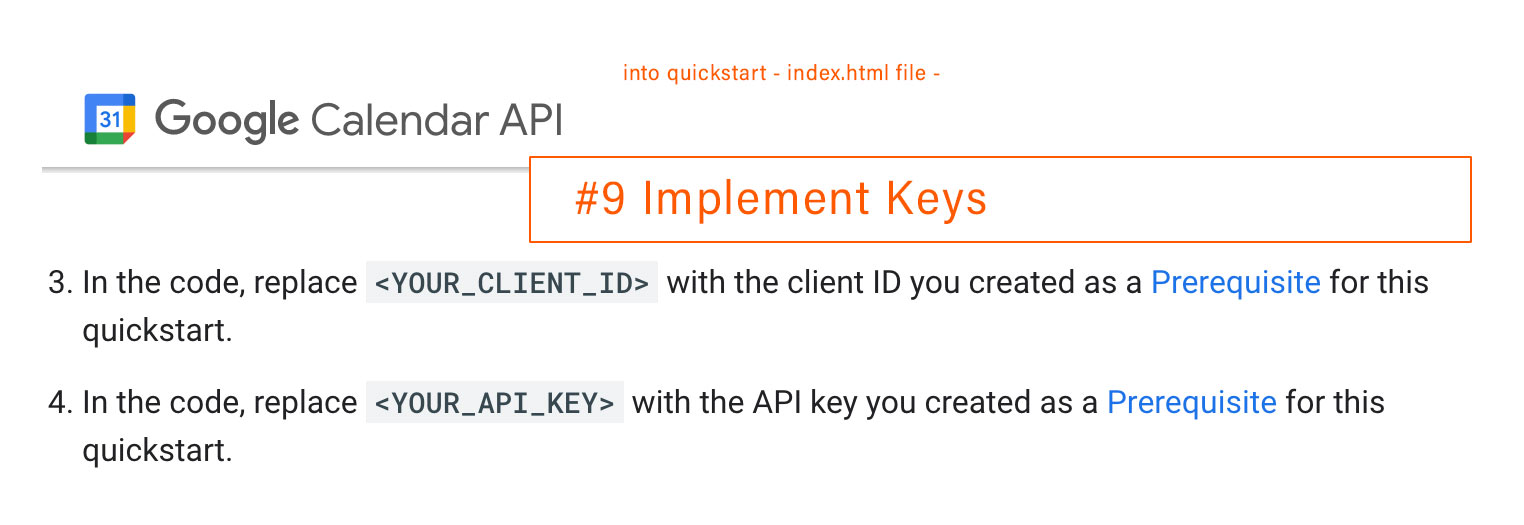
- Note the Client ID. Client secrets aren’t used for Web applications.
- Click OK. The newly created credential appears under “OAuth 2.0 Client IDs.”
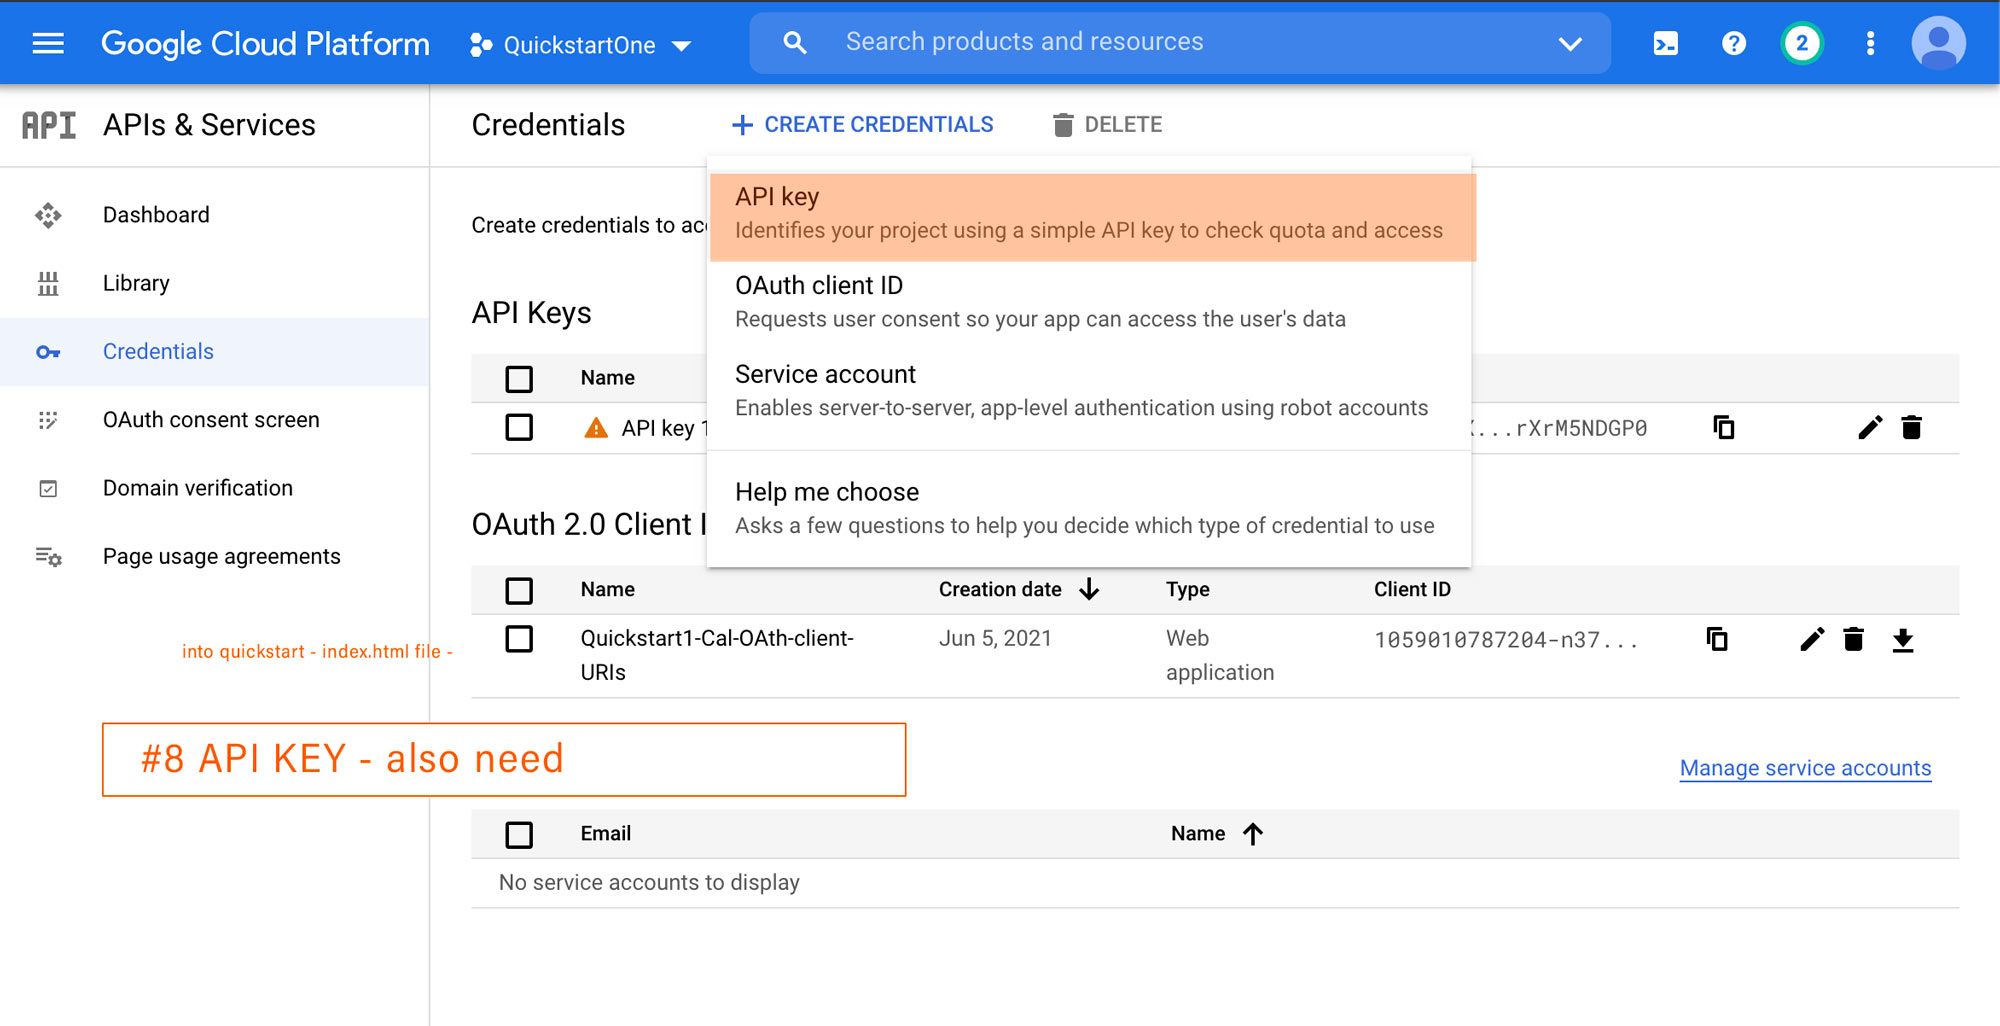
- (Optional). If you’re creating credentials as a prerequisite for a JavaScript quickstart, you must also generate an API key. To generate an API key:
- Click the Create Credentials drop-down list and select API Key. The “API Key created” page appears.
- Note the API key.
- Click Close. The newly created credential appears under “API Keys.”
Create Web application credentials (web server app)
If you’re creating Web application credentials for a web server app, follow these steps :- For web server applications using languages and frameworks like PHP, Java, Python, Ruby, and .NET, specify authorized redirect URIs:
- Under Authorized redirect URIs, click Add URI.
- Type a URI in the URIs field. The redirect URIs are the endpoints to which the OAuth 2.0 server can send responses.
- Click Create. The OAuth client created screen appears. This screen shows the Client ID and Client secret.
- Click the download button to the right of the newly-created OAuth 2.0 Client ID. This copies a client secret JSON file to your desktop. Note the location of this file.
Create Desktop application credentials
If you’re creating Desktop application credentials:- Click Create. The OAuth client created screen appears. This screen shows the Client ID and Client secret.
- Click OK. The newly created credential appears under “OAuth 2.0 Client IDs.”
- Click the download button to the right of the newly-created OAuth 2.0 Client ID. This copies a client secret JSON file to your desktop. Note the location of this file.
- (Optional) If you are creating credentials for a quickstart, rename the client secret JSON file to “credentials.json”.
Create Chrome application credentials
If you’re creating Chrome application credentials:- In the Application ID field, enter the last part of your app’s Chrome Web Store URL.
- Click Create. The OAuth client created screen appears. This screen shows the Client ID and client secret.
- Click OK. The newly created credential appears under “OAuth 2.0 Client IDs.”
Create Android application credentials
If you’re creating Android application credentials:- In the package name field, enter the package name from your
AndroidManifest.xmlfile. - In the SHA-1 certificate fingerprint field, enter the SHA-1 certificate fingerprint.
- Click Create. The OAuth client created screen appears. This screen shows the Client ID.
- Click OK. The newly created credential appears under “OAuth 2.0 Client IDs.”
Create iOS application credentials
If you’re creating iOS application credentials:- In the Bundle ID field, enter the bundle identifier as listed in the app’s
Info.plistfile. - If your app appears in the Apple app store, enter the App Store ID.
- In the Team ID field, enter your Team ID.
- Click Create. The OAuth client created screen appears. This screen shows the Client ID.
- Click OK. The newly created credential appears under “OAuth 2.0 Client IDs.”
Create TVs and limited input device credentials
If you’re creating Chrome application credentials:- Click Create. The OAuth client created screen appears. This screen shows the Client ID and client secret.
- Click OK. The newly created credential appears under “OAuth 2.0 Client IDs.”
Create Universal Windows Platform (UWP) credentials
If you’re Universal Windows Platform (UWP) creating Universal Windows Platform (UWP) credentials:- In the Store ID field, enter the last part of your app’s Microsoft Store URL.
- Click Create. The OAuth client created screen appears. This screen shows the Client ID and client secret.
- Click OK. The newly created credential appears under “OAuth 2.0 Client IDs.”
Create a service account with domain-wide delegation of authority
Creating a service account with domain-wide delegation of authority is a four-step process:- Create the service account.
- Obtain service account credentials.
- Enable domain-wide delegation for the service account.
- Grant access to user data to the service account.
Create a service account:
- Open the Google Cloud Console.
- Next to Google Cloud Platform, click the Down arrow and select a project.
- At the top-left corner, click Menu .
- Click IAM & Admin > Service Accounts. The Service account page appears.
- Click Create service account. The “Create service account page appears with the “Service account details section open.”
- Fill in the service account details. By default, Google creates a unique service account ID. If you would like to change the ID, modify the ID in the service account ID field.
- Click Create. The “Grant service account access to project” section appears. This section is used to grant your service account role(s) to perform tasks on resources held within your Google Cloud Console project, such as creating other service accounts.
- (Optional) Identify roles for your service account. For further information, refer to Granting, changing, and revoking access to resources.
- Click Continue. The “Grant users access to this service account” section appears. This section is used identify users or groups that can be impersonated by this user account.
- (Optional) Identify users, groups, and admins who can have access to this service account. For further information, refer to Managing service account impersonation.
- Click Done. Your list of service accounts appears.
Obtain service account credentials
You must obtain credentials in the form of a public/private key pair. These credentials are used by your code to authorize service account actions within your app. To obtain credentials for your service account:- Click on your newly-create service account.
- Click Keys.
- Click Add key > Create new key. The “Create private key” dialog appears.
- Select JSON.
- Click Create. Your new public/private key pair is generated and downloaded to your machine; it serves as the only copy of this key. For information on how to store your key securely, see Managing service account keys.
- Click Close. The list of keys appears.
Enable domain-wide delegation for a service account
- Click Details. The service account details appear.
- Click Show domain-wide delegation.
- Check Enable Google Workspace domain-wide delegation.
- Note the client ID. The client ID is used in the next section.
Grant access to user data to a service account
To access user data on a Google Workspace domain, the service account that you created needs to be granted access to user data through an API. This process must be performed by a super administrator for the domain. To grant your service account access to user data:- Open the Admin Console.
- Click Main menu > Security > API controls
- Scroll down and click Manage Domain Wide Delegation.
- Click Add new. The “Add a new client ID” dialog box appears.
- In the “Client ID” field, enter the client ID obtained from the service account creation steps above.
- In the “OAuth Scopes” field, enter a comma-delimited list of the scopes required by your application. This is the same set of scopes you defined when configuring the OAuth consent screen.
- Click Authorize.
Overal Sidebar Navigation
HOW TO:https://cloud.google.com/resource-manager/docs/how-to
CONCEPTS: https://cloud.google.com/resource-manager/docs/concepts
ENABLE PROJECT: https://developers.google.com/workspace/guides/create-project
RESOURCES MANAGER:https://cloud.google.com/resource-manager
https://www.npmjs.com/package/react-google-calendar-api
https://developers.google.com/calendar/overview
https://developers.google.com/calendar/quickstarts-overview
https://developers.google.com/workspace/guides/getstarted-overview
https://developers.google.com/workspace/guides/create-project
https://developers.google.com/speed/pagespeed/insights/
- Resource Manager
- Product overview
- Quickstarts
- All quickstarts
- Quickstart using organizations
- Quickstart enforcing constraints
- How-to guides
- All how-to guides
- Managing projects
- Moving projects
- Managing folders
- Managing Organizations
- Creating and managing labels
- Creating and managing tags
- Audit logging
- Managing notifications
- Managing contacts for notifications
- Super administrator best practices
- Listing all resources
- Using constraints
- Creating and managing organization policies
- Setting an organization policy with tags
- Restricting identities by domain
- Restricting IAM service account usage
- Restricting resource locations
- Resource locations supported services
- Cloud Audit Logging
- Disabling Cloud Logging
- Develop applications in a constrained environment
- Discover why leading businesses choose Google Cloud
- Learn more
- Key benefits
- Overview
- Multicloud
- Trust and security
- Global infrastructure
- Data analytics
- Open cloud
- Sustainability
- Productivity and collaboration
- Resources
- Events
- Blog
- Customer stories
- Analyst reports
- Industry Solutions
- Retail
- Consumer Packaged Goods
- Financial Services
- Healthcare and Life Sciences
- Media and Entertainment
- Telecommunications
- Gaming
- Manufacturing
- Supply Chain and Logistics
- Government
- Education
- Small and Medium Business
- See all solutions
- Application Modernization
- Hybrid and Multi-cloud Application Platform
- Cloud-Native App Development
- API Management
- Serverless Solutions
- DevOps
- Continuous Delivery (CD)
- Continuous Integration (CI)
- Mainframe Modernization
- Hosting
- Artificial Intelligence
- Contact Center AI
- Document AI
- Cloud Talent Solution
- Business Application Platform
- New Business Channels Using APIs
- Unlocking Legacy Applications Using APIs
- Open Banking APIx
- Databases
- Database Migration
- Database Modernization
- Google Cloud Databases
- Migrate Oracle workloads to Google Cloud
- Open Source Databases
- SQL Server on Google Cloud
- Digital Transformation
- Business Continuity
- Digital Innovation
- Operational Efficiency
- COVID-19 Solutions
- COVID-19 Solutions for the Healthcare Industry
- Infrastructure Modernization
- Application Migration
- SAP on Google Cloud
- High Performance Computing
- Windows on Google Cloud
- Data Center Migration
- Active Assist
- Virtual Desktops
- Rapid Assessment & Migration Program (RAMP)
- Backup and Disaster Recovery
- Productivity and Collaboration
- Google Workspace
- Google Workspace Essentials
- Cloud Identity
- Chrome Enterprise
- Cloud Search
- Security
- Security Analytics and Operations
- Web App and API Protection
- Smart Analytics
- Data Warehouse Modernization
- Stream Analytics
- Marketing Analytics
- Data Lake Modernization
- Business Intelligence
- Datasets
- Featured Products
- Compute Engine
- Cloud Storage
- Cloud SDK
- Cloud SQL
- Google Kubernetes Engine
- BigQuery
- Cloud CDN
- Dataflow
- Operations
- Cloud Run
- Anthos
- See all products (100+)
- AI and Machine Learning
- Vertex AI
- Speech-to-Text
- Vision AI
- Text-to-Speech
- Cloud Translation
- Cloud Natural Language
- AutoML
- Video AI
- AI Infrastructure
- Dialogflow
- AutoML Tables
- See all AI and machine learning products
- API Management
- Apigee API Management
- Cloud Endpoints
- Cloud Healthcare API
- AppSheet
- API Gateway
- Compute
- Compute Engine
- App Engine
- Cloud GPUs
- Migrate for Compute Engine
- Preemptible VMs
- Shielded VMs
- Sole-Tenant Nodes
- Bare Metal
- Recommender
- VMware Engine
- Cloud Run
- See all compute products
- Containers
- Google Kubernetes Engine
- Container Registry
- Container Security
- Cloud Build
- Deep Learning Containers
- Kubernetes Applications
- Artifact Registry
- Knative
- Cloud Run
- Cloud Code
- Data Analytics
- BigQuery
- Looker
- Dataflow
- Pub/Sub
- Dataproc
- Cloud Data Fusion
- Cloud Composer
- Data Catalog
- Dataprep
- Google Data Studio
- Google Marketing Platform
- Cloud Life Sciences
- Databases
- Cloud Bigtable
- Firestore
- Memorystore
- Cloud Spanner
- Cloud SQL
- Database Migration Service
- Bare Metal
- Firebase Realtime Database
- Developer Tools
- Artifact Registry
- Cloud Build
- Cloud Code
- Cloud Deployment Manager
- Cloud SDK
- Cloud Scheduler
- Cloud Source Repositories
- Cloud Tasks
- Container Registry
- Tekton
- See all developer tools
- Healthcare and Life Sciences
- Apigee Healthcare APIx
- Cloud Healthcare API
- Cloud Life Sciences
- Healthcare Natural Language AI
- Hybrid and Multi-cloud
- Anthos
- Looker
- Cloud Run for Anthos
- Google Cloud Marketplace for Anthos
- Migrate for Anthos
- Operations
- Cloud Build
- Traffic Director
- Apigee API Management
- Internet of Things
- Cloud IoT Core
- Edge TPU
- Management Tools
- Cloud Shell
- Cloud Console
- Cloud Deployment Manager
- Cloud Mobile App
- Cloud APIs
- Private Catalog
- Cost Management
- Intelligent Management
- Media and Gaming
- Game Servers
- OpenCue
- Migration
- Application Migration
- BigQuery Data Transfer Service
- Cloud Foundation Toolkit
- Database Migration Service
- Migrate for Anthos
- Migrate for Compute Engine
- Rapid Assessment & Migration Program (RAMP)
- Transfer Appliance
- Storage Transfer Service
- VMware Engine
- Networking
- Cloud Armor
- Cloud CDN
- Cloud DNS
- Cloud Load Balancing
- Cloud NAT
- Hybrid Connectivity
- Network Intelligence Center
- Network Service Tiers
- Network Telemetry
- Traffic Director
- Virtual Private Cloud
- Service Directory
- Operations
- Cloud Logging
- Cloud Monitoring
- Error Reporting
- Kubernetes Engine Monitoring
- Cloud Trace
- Cloud Profiler
- Cloud Debugger
- Intelligent Operations
- Security and Identity
- Cloud IAM
- Assured Workloads
- Cloud Key Management
- Confidential Computing
- Security Command Center
- Cloud Data Loss Prevention
- Managed Service for Microsoft Active Directory
- Access Transparency
- Titan Security Key
- Secret Manager
- BeyondCorp Enterprise
- See all security and identity products
- Serverless Computing
- Cloud Run
- Cloud Functions
- App Engine
- Workflows
- Storage
- All Storage Products
- Cloud Storage
- Filestore
- Persistent Disk
- Cloud Storage for Firebase
- Local SSD
- Archival Storage
- Storage Transfer Service
- Google Workspace Essentials
- Save money with our transparent approach to pricing
- Request a quote
- Google Cloud
- Pricing overview
- Price list
- Pricing calculator
- Google Cloud Free Program
- Related Products
- Google Workspace
- Google Maps Platform
- Chrome Enterprise
- Apigee
- Looker
- Firebase
- Get started with Google Cloud
- Get started for free
- Self-service Resources
- Quickstarts
- Best practices
- Google Cloud Certification
- Expert help and training
- Consulting
- Technical Account Management
- Training
- Partners and third-party tools
- Partner directory
- Become a partner
- Google Cloud Marketplace
- More ways to get started