https://www.asustor.com/en-gb/online/College_topic?topic=224
COURSE OBJECTIVES Upon completion of this course you should be able to: \1. Configure your network equipment to setup remote access to your NAS via the Internet.
PREREQUISITES *Course Prerequisites:* NAS 221: Remote Access – Using EZ ConnectTM *Students are expected to have a working knowledge of:* Signing up for DDNS services and setting up routers
OUTLINE \1. Remote Access 1.1 Accessing your ASUSTOR NAS using the Internet 1.2 Configuring your router 1.3 Configuring DDNS service 1.4 Additional notes
Appendix List of Ports Used by ASUSTOR Applications
1. Remote Access 1.1 Accessing your ASUSTOR NAS using the Internet
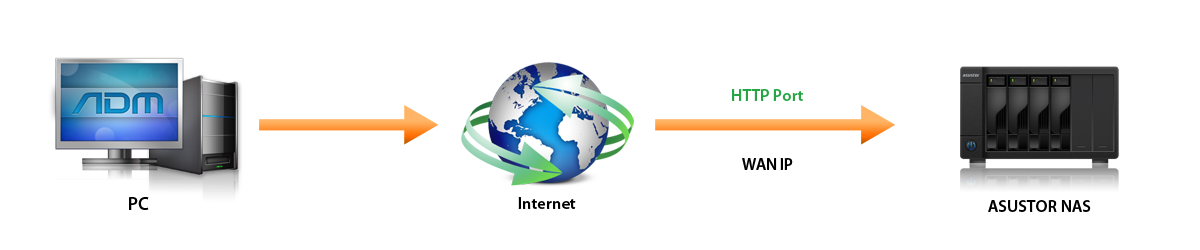
ASUSTOR provides users with quick and convenient solutions that allow them to use their NAS through the internet and remotely access their files, creating an exclusive private cloud. You can use any of the following methods to set up remote access to your NAS.
a. Directly connecting your NAS to the internet
If you have a static IP address, you can choose to directly connect your NAS to the Internet, without having to go through any routers or firewalls. Please note that this method will directly expose your NAS to the Internet and you may be more likely to experience malicious attacks.
** **
b. Connect your NAS to your router and then use ASUSTOR EZ Connect**TM**
ADM’s built-in EZ ConnectTM function can help you to complete the necessary router configurations for setting up remote access to your NAS. For more information please see:
NAS 221 Remote Access – Using EZ Connect

c. Connect your NAS to the internet and manually configure your connection. If you are using an incompatible router and cannot use EZ ConnectTM to complete your remote connection settings, the instructions below will explain how to manually configure your router to give you remote access to your NAS.
1.2 Configuring your router Ports are like telephone extension numbers in that they allow you to quickly find the person or service that you are looking for. To let the NAS on your local area network allow access from devices on the internet, you must first set up the correct port forwarding on your router. This way, when connection requests are received from the internet asking for the appropriate port, the router will know where to direct them. Before configuring port forwarding please first note your router’s IP address, administrator username and password. Usually port forwarding settings are located under one of the following headings on your router’s settings page: ▪ Advanced Settings ▪ Firewall Settings ▪ Port Forwarding ▪ Virtual Server
In the following example, we will demonstrate how to set up port forwarding on a router made by ASUS.
STEP 1
- Enter the router’s LAN IP address into a Web browser. The ASUS router’s default IP address is 192.168.1.1.
- Enter the administrator username and password. The default username and password for the ASUS router is “admin”.
- In the [Advanced Settings] panel on the left hand side, click on [WAN].
- Click on the [Virtual Server/Port Forwarding] tab.
STEP 2
- Enable port forwarding by clicking on the [Yes] radio button beside the [Enable Port Forwarding] heading.
- Under the [Service Name] field enter a name of your choice, and then enter the number of the external port you want to open, your NAS’s IP address and port number in the corresponding fields. If you want to use your Web browser to access your NAS, you will need to open ADM’s Web page service (default port: 8000). The table below shows you the information that you will need to fill out for each field.
| Service Name | Port Range | Local IP | Port | Protocol |
|---|---|---|---|---|
| ADM | 8000 | 192.168.2.6 | 8000 | TCP |
As mentioned previously, the IP address of the NAS in our example is 192.168.2.6.

- If you wish to open up other services in order to access them through the internet, please see the Appendix of this guide.
Appendix: List of ports used by ASUSTOR applications.
1.3 Configuring DDNS service
STEP 1
- Sign up for DDNS service. For instructions please see section 1.2 of NAS 321: Hosting Multiple Websites with a Virtual Host.
STEP 2
- Enable DDNS service on the NAS. For instructions please see section 2.2 of NAS 321: Hosting Multiple Websites with a Virtual Host.

1.4 Additional notes \1. The Internet uses ports to exchange data; each specific port can only be assigned to be used by one specific application or service. Two computers cannot simultaneously use the same port to access data.
\2. Settings and configuration methods will differ between routers. If you require more detailed information on port settings please see the instruction manual for your router or visit the following website: http://portforward.com/routers.htm
** **
Appendix
List of ports used by ASUSTOR applications
| Service | Port | Protocol |
|---|---|---|
| ADM Web service | 8000, 8001 | TCP |
| Web service | 80, 443 | TCP |
| FTP service | 21 | TCP |
| MySQL service | 3306 | TCP |
| SSH service | 22 | TCP |
| Rsync service | 873 | TCP |
| iSCSI service | 3360 | TCP |
| Common Unix Printing System | 631 | TCP/UDP |
| Download Center | 9999, 55555 | TCP/UDP |
| WebDAV | 9800, 9802 | TCP |
https://www.asustor.com/en-gb/online/College_topic?topic=321
COURSE OBJECTIVES Upon completion of this course you should be able to: \1. Host websites on the ASUSTOR NAS using the virtual host function \2. Enable DDNS service for the ASUSTOR NAS
PREREQUISITES *Course Prerequisites:* None *Students are expected to have a working knowledge of:* Hosting Websites
OUTLINE \1. Obtaining a Unique Hostname 1.1 If you have a static IP address 1.2 If you have a dynamic IP address \2. Hosting Websites Using the Virtual Host Function 2.1 Enabling the Web server and adding a new virtual host (website) 2.2 Enabling DDNS service
1. Obtaining a Unique Hostname
You can host multiple websites on your ASUSTOR NAS by setting up virtual hosts. However, before setting up virtual hosts you should obtain a unique hostname for your ASUSTOR NAS either by registering for your own domain or by subscribing for DDNS service.
1.1 If you have a static IP address If you have a static IP address, then you most likely will want to register for your own domain name. The company you register with will be able to provide DNS service for your unique hostname. You only need to provide them with your IP address and they will help you to map your hostname to your IP address.
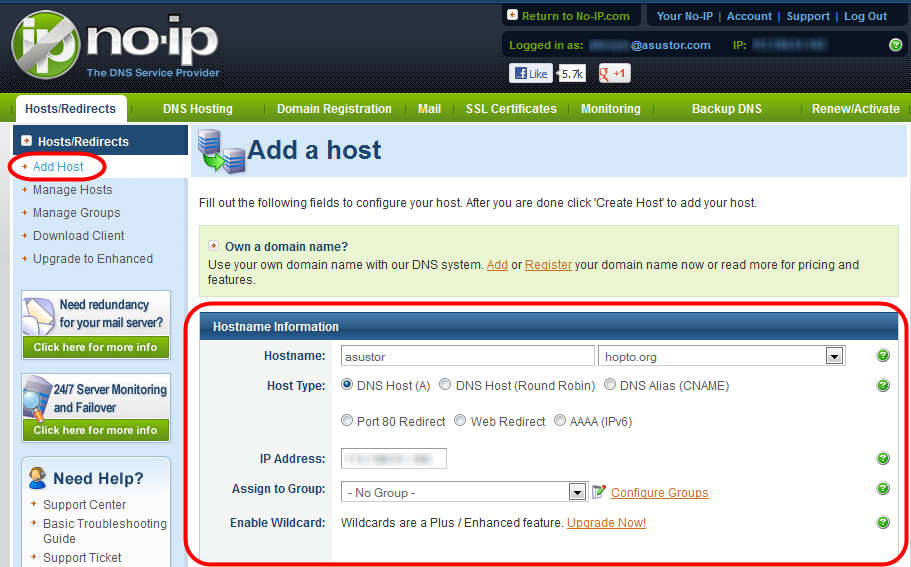
1.2 If you have a dynamic IP address
If you have a dynamic IP address, then you may want to subscribe for free DDNS service in order to obtain a unique hostname for your ASUSTOR NAS. There are a number of companies offering free DDNS service. However, in our example we have decided to use no-ip.com. After registering with the company, you will be able to create a unique hostname and then have it mapped to your dynamic IP address. The company will periodically update your IP address in order to ensure that it is always mapped to your hostname.

2. Hosting Websites Using the Virtual Host Function ASUSTOR NAS supports virtual hosting for hosting multiple domain names on the NAS. In the following example we will walk you through the process of hosting a website using the virtual host function. 2.1 Enabling the Web server and adding a new virtual host (website)
STEP 1
Select [Services] → [Web Server]. Select the [Enable Web server] checkbox found under the Web Server heading and then click [Apply].

STEP 2
In order to check that the setting has been successfully applied, enter the ASUSTOR NAS’s IP address into a Web browser and connect to it. You should be able to see the “Congratulations!” page as shown in the graphic below. This page is located in the ASUSTOR NAS’s “Web” shared folder. In order to host a website on the ASUSTOR NAS, you must upload it to the “Web” shared folder of the NAS.

STEP 3
Now click on the Virtual Host tab and then click on the [Add] button.
STEP 4
The Virtual Host window will now appear. Fill out the required fields and then click [OK] once you are done. Your website should now be successfully hosted on the NAS.

2.2 Enabling DDNS service If you have subscribed for DDNS service, you can also create a unique hostname to use with your NAS. In the following example we will walk you through the process of enabling DDNS service on the NAS.
STEP 1
ü Select [Settings] > [Ease of Access] and then click on the [DDNS] tab.
ü Select the [Enable DDNS service] checkbox.
ü Select your DDNS provider from the drop-down list. If you haven’t signed up for DDNS service you can select a provider and then click on the Sign up now link to register.
ü Fill out the rest of the required fields and then click on [Apply] once you are done. DDNS service should now be successfully enabled on the NAS.

SFTP
 [GO] => connect to server afp://NASIPADDRESS
afp://10.0.0.144
General Here you can manage the system HTTP port and auto logout settings. Auto logout will logout users if they remain idle past the specified period of time. System HTTP Port: This is used to specify the port you wish to use to connect to ADM’s web based user interface. You can access your NAS by opening a web browser and entering your IP address followed by a colon and the specified port number.
For example: http://192.168.1.168:8000
Timeout timer: For security concerns, users that remain idle past the specified period of time after logging on will be automatically logged of
Sharing / Connecting to MAC from NAS
https://www.asustor.com/en-gb/online/College_topic?topic=108
COURSE OBJECTIVES Upon completion of this course you should be able to: \1. Access the files on your NAS using Mac OS X \2. Use Apple’s Time Machine to backup your NAS
PREREQUISITES *Course Prerequisites:* None *Students are expected to have a working knowledge of:* Apple Mac OS X
OUTLINE \1. Configuring your NAS 1.1 Enabling AFP Service 1.2 Enabling Time Machine Support \2. Configuring Apple Mac OS X 2.1 Connecting to your NAS via AFP 2.2 Using Time Machine to Backup your NAS
1. Configuring your NAS
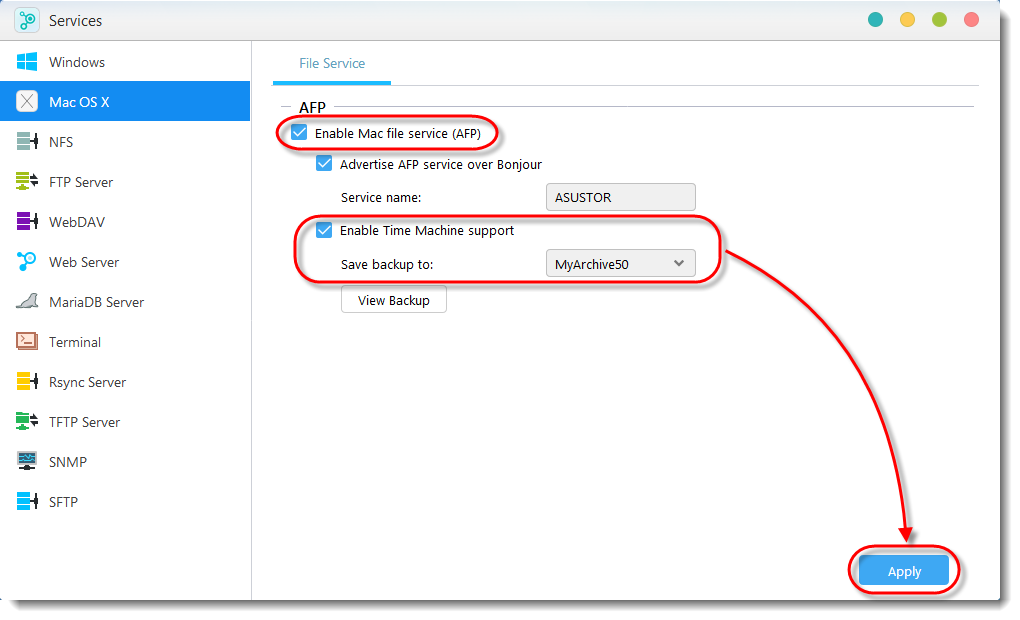
1.1 Enabling AFP Service
STEP 1
- Log into your ADM and then select [Services] > [Mac OS X].
- Select the [Enable Mac file service (AFP)] checkbox.
1.2 Enabling Time Machine Support
STEP 1
- Select the [Enable Time Machine support] checkbox and then select the folder that you wish to save your backup to, by using the drop-down list (In our example, “MyArchive50”).
- Once you are finished, click [Apply].
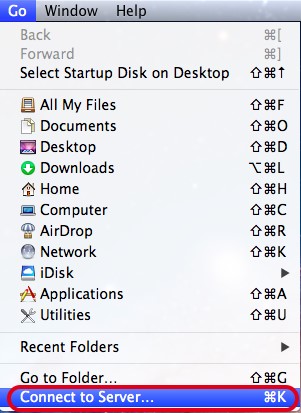
2. Configuring Apple Mac OS X 2.1 Connecting to your NAS via AFP
STEP 1
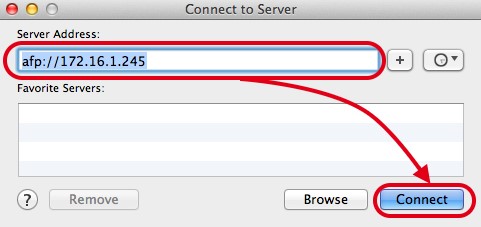
In Mac OS X select [Go] → [Connect to Server…].
STEP 2
In the [Server Address:] field, enter your NAS’s IP address and then click [Connect] (For example: afp://172.16.1.245).
STEP 3
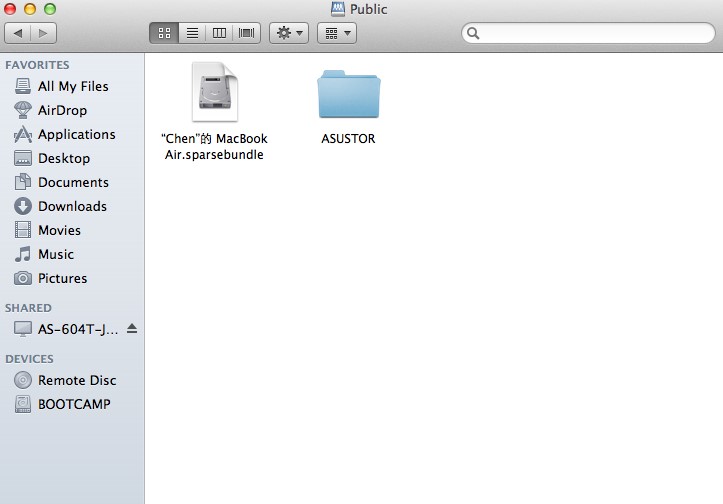
Select the folder that you wish to connect to and click [OK] (in our example, “Public”).

STEP 4
This is what the screen should look like once you have successfully connected to your NAS.
2.2 Using Time Machine to Backup your NAS
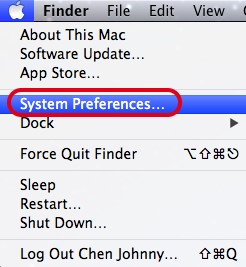
STEP 1
To open Time Machine, from the Apple menu select [System Preferences…] → [Time Machine].

STEP 2
Once opened, make sure that the Time Machine slider is in the “ON” position. You will then be able to see the previously specified folder “TMBackup”. Select the folder and then click [Use Backup Disk].

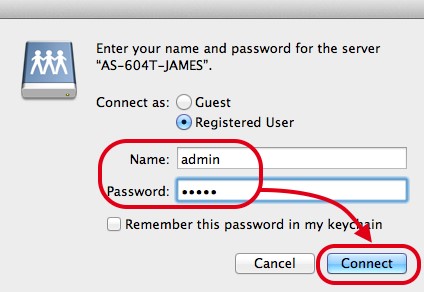
STEP 3
Enter the username and password for your NAS and then click [Connect].
STEP 4
This is what the screen should look like after configuration is complete. You will be able to see information regarding: folder name, available space, oldest backup, latest backup, and next backup.

Note: If you wish to learn more about Time Machine please see Mac 101: Time Machine (http://support.apple.com/kb/HT1427).
Bonjour Service
The short answer is Bonjour is a service (i.e. constantly running computer program) that runs on Mac OS X computers. It's purpose is to manage services and resources on your Local Area Network (LAN) with absolutely no intervention or configuration from you. Examples of services and resources include the following;
Printers
Fax Machines
Access to files on other computers
Apple TV devices to playback movies on your big screen TV
Airport Express devices to playback music on stereo systems
Gaming computers and consoles that network for multi player games
etc.
The problem with short answers is they are not often clear and don't supply all the information you need to get what's actually going on. Feel free to read on and stop reading when your eyes glaze over. You won't hurt my feelings. LOL
Bonjour can be useful on home or small office networks that do not have a server to supply name look up help for the computers on the network. This is important because it is often the case that a user or a computer program on a given computer needs to use a service or resource that does not reside on that particular computer. The needed resource may however be available on another computer or device on the computer network.
When OS X on your computer is asked by you or by a computer program running on your computer to use one of these network services, it turns to Bonjour to find out the IP address of the computer or device that has the needed resource. Bonjour does this by reading a list of resources that it stores locally on your computer. This list is similar to a telephone book in that it keeps a list of device names and their corresponding IP addresses. But it also stores other information about what kinds of services or resources these devices have to share.
As Macs, printers and other devices come online on your network, each one advertises what resources it has to share to the other computers on the network. The Macs running Bonjour on the network record this information in their respective look up lists for later use.
If a needed resource isn't listed in the look up list, Bonjour broadcasts a query over the network asking for the resource being sought. Any computer or device that can offer the needed resource replies to the query with it's Name, IP address, the needed resource and any other shared services it has to offer. A session is then established to communicate between your computer and the remote computer or device that can offer the resource.
If you would like to know more, the following link is a good read about what Bonjour is and how it works. The article is targeted at software developers but it isn't too terribly technical and you might find it useful;
https://developer.apple.com/library/mac/#documentation/Cocoa/Conceptual/NetServi ces/Articles/about.html
Sharing folders on NAS
https://www.asustor.com/online/online_help?id=39
Here you can manage your shared folders and set up their access rights in relation to users and user groups. Shared folders allow your NAS to become a file server. They are fundamental in sharing files with the outside world. Consequently, correctly setting up their access rights is very important in the management of your data.
Invisible in "Network" or "My Network Places": This setting only applies if you are using Microsoft Windows. When you enable this setting, your NAS will cease to automatically appear in "Network" or in "My Network Places". Please note that enabling this setting will not affect the connection to your NAS in any way.
Empty Recycle Bin: Click this button to empty all contents in this shared folder’s Recycle Bin immediately.
Encrypt this shared folder: Here you can choose whether or not you want to encrypt your shared folder and whether or not you want to auto-mount it at system startup. Should you choose to encrypt your folder, after the system restarts, you will have to manually enter the password or import the encryption key for the folder in order to access it. Encrypted folders are normally used for the storage of critical or confidential data. Should you lose your NAS you still needn’t worry about your data leaking out and falling into the wrong hands.
Convert to the new ASUSTOR encryption mechanism: This option will only appear under “Edit” for encrypted folders that have been encrypted using ASUSTOR’s previous encryption mechanism. Converting to the new encryption mechanism will require extra volume space in order to temporarily store all the files originally in the folder. This required space is the total capacity of all the files in the shared folder.
Export/import encrypted key: Selecting “Export encrypted key” will download the encrypted key to your computer. When you need to mount an encrypted folder, you can select “Enter Password” or “Import encrypted key” to mount the shared folder and begin accessing it.
Reminder: You can choose to enable or disable encryption for folders even after they have been created. Encryption is available for use with all shared folders and is not just limited to system default folders. The access speed for encrypted folders will normally be slower than for unencrypted folders.
Warning:
- When choosing to use encrypted shared folders, please make it a point to remember your password. Should you forget your password, the data in the shared folder will become unrecoverable.
- Older versions of ADM are unable to read the contents of shared folder encrypted using the new encryption mechanism introduced in ADM 2.4.0. If you wish to downgrade your firmware to 2.3.1 or an older version, please first decrypt any shared folders that have been encrypted using the new encryption mechanism before you begin downgrading.
NFS Privileges: Here you can set NFS privileges for individual folders after first enabling NFS service.
About Shared Folders
After initialization, the system will automatically create a shared folder "public". By default, all users can access the files in this folder. Additionally, the system will automatically create a personal folder for each user (using the user's account name) that by default, can only be accessed by the mentioned user.
- Windows ACL: Here you can choose to enable or disable Windows ACL for specified shared folders.
About Windows ACL
- After enabling Windows ACL for a shared folder, the shared folder and all subfolders and files contained within it can be assigned user or group permissions.
- The following shared folders do not support Windows ACL permissions: Home, User Homes, PhotoGallery, Web, Surveillance, MyArchive, Network Recycle Bin, virtual devices, external devices (USB hard drives, optical drives).
- After enabling Windows ACL you will be able to use ADM’s File Explorer or Microsoft Windows Explorer to configure permissions. After disabling Windows ACL you will only be able to configure permissions from within ADM's File Explorer.
- If you enable Windows ACL and then later decide to disable it, all file and folders will be re-assigned with Read & Write permissions for all users.
- No matter if you are using Windows ACL or not, users will still require shared folder and file permissions in order to access files.
- Folder – Access Rights: Shared folders access rights are the first level of access rights that will be examined. You can edit them here.
Permission Mapping Table
| Deny Access | Read & Write | Read Only | No Settings | |
|---|---|---|---|---|
| Deny Access | Deny Access | Deny Access | Deny Access | Deny Access |
| Read & Write | Deny Access | Read & Write | Read & Write | Read & Write |
| Read Only | Deny Access | Read & Write | Read Only | Read Only |
| No Settings | Deny Access | Read & Write | Read Only | Deny Access |
 : User access rights for shared folders
 : Group access rights for shared folders
Priority of access rights: Deny Access > Read & Write > Read Only > No settings
NAS AFP ADDRESS
Network address formats and protocols on Mac
Other users can access shared folders on this computer, and administrators all volumes, at
“afp://10.0.0.231” or “smb://10.0.0.231”
If you know the address for a shared computer or server on your network, you can use it to connect to the computer or server. You can connect to Mac and Windows computers with file sharing turned on, as well as servers that use SMB/CIF, AFP, NFS, and FTP.
The network address consists of a protocol (such as smb://) followed by the Domain Name System (DNS) name and any additional pathname for the computer. Check the table below for the correct address format to use to connect to different types of servers.
| Sharing Protocol | Address Format |
|---|---|
| SMB/CIFS (Windows) servers and shared folders | Use one of these formats:smb://DNSname/sharenamesmb://IPaddress/sharenameYou can also use the computer name. If you don’t specify the shared folder as part of the address, you can choose it after you enter your user name and password. |
| AFP File Sharing | afp://ComputerName.CompanyName.comTo see the AFP file sharing address for a Mac, choose Apple menu  > System Preferences, click Sharing, then select File Sharing. The address appears in the window. > System Preferences, click Sharing, then select File Sharing. The address appears in the window. |
| NFS server | nfs://DNSname/pathname |
| WebDAV server | http://DNSname/pathnameYou can use the Internet Protocol (IP) address for the computer instead of its DNS name. |
From the Finder, you can connect to FTP servers only with read-only access. To copy files to an FTP server, use an FTP app.
See alsoSet up file sharing on MacConnect your Mac to shared computers and servers
https://support.apple.com/guide/mac-help/set-up-file-sharing-on-mac-mh17131/mac
Set up file sharing on Mac
You can share files and folders with others on your network. You can share your entire Mac with everyone or allow specific users access to only certain folders.
Set up file sharing
On your Mac, choose Apple menu
 > System Preferences, then click Sharing.
Select the File Sharing checkbox.
To select a specific folder to share, click the Add button
 at the bottom of the Shared Folders list, locate the folder, select it, then click Add.
The Public folder of each user with an account on your Mac is shared automatically. To prevent a folder from being shared, select it in the Shared Folders list and click the Remove button
 .
.Control-click the name of the folder, choose Advanced Options, select desired options, then click OK.
By default, any user set up on your Mac in Users & Groups preferences can connect to your Mac over the network. A user with an administrator account can access your entire Mac.
To give only specific users or groups access to a folder, select the folder in the Shared Folders list, click the Add button
at the bottom of the Users list, then do one of the following:- Add users or groups from all users of your Mac: Select Users & Groups in the list on the left, select one or more names in the list on the right, then click Select.
- Add users or groups from everyone on your network: Select Network Users or Network Groups in the list on the left, select one or more names in the list on the right, then click Select.
- Add someone from your contacts and create a sharing-only account for them: Select Contacts in the list on the left, select a name in the list on the right, click Select, create a password, then click Create Account.
To specify the amount of access for a user, select the user in the Users list, click the pop-up menu next to the user name, then choose one of the following:
- Read & Write: The user can see and copy files to and from the folder.
- Read Only: The user can view the contents of the folder but can’t copy files to it.
- Write Only (Drop Box): The user can copy files to the folder but can’t view its contents.
- No Access: The user can’t see or copy files from the folder.
Set advanced file sharing options
Use advanced file sharing options to set the protocol and other options for each shared file.
On your Mac, choose Apple menu
> System Preferences, click Sharing, then select File Sharing.Control-click the name of the shared folder, then choose Advanced Options.
Select advanced options:
- Allow guest users.
- Only allow SMB encrypted connections.
- Share as a Time Machine backup destination.
Click OK.
Guests can access shared folders on your Mac. To turn off guest access, deselect “Allow guest users to connect to shared folders” in the Guest Account pane of Users & Groups preferences. See Set up users, guests, and groups.
See alsoConnect your Mac to shared computers and serversShare files with others who use your MacSet up Bluetooth sharing on MacSet the protocol for file sharing on MacBack up to a shared folder with Time Machine on MacUse iCloud File Sharing to share folders and documents with other iCloud users