
Door Jamb Fixer-Upper
Your photo shows a long vertical split running right down the grain of the door jamb through the strike plate area. Do not drive 3-inch screws straight into the split jamb yet, because tightening screws into split wood will force the crack wider and strip out the wood behind the plate.
- Visual Assessment
The frame has three distinct areas that need attention before and during tightening:
- Upper & Lower Jamb Splits: Deep vertical cracks run above and below the strike plate, meaning the jamb wood is separated from the structural framing behind it.
- Strike Plate & Mortise: The latch strike plate is mounted directly over the split line, so standard short screws have nothing solid to grip.
- Lower Latch / Rim Lock Area: The lower strike cutout and upper rim-lock housing also rely on this same split strip of wood for stability.
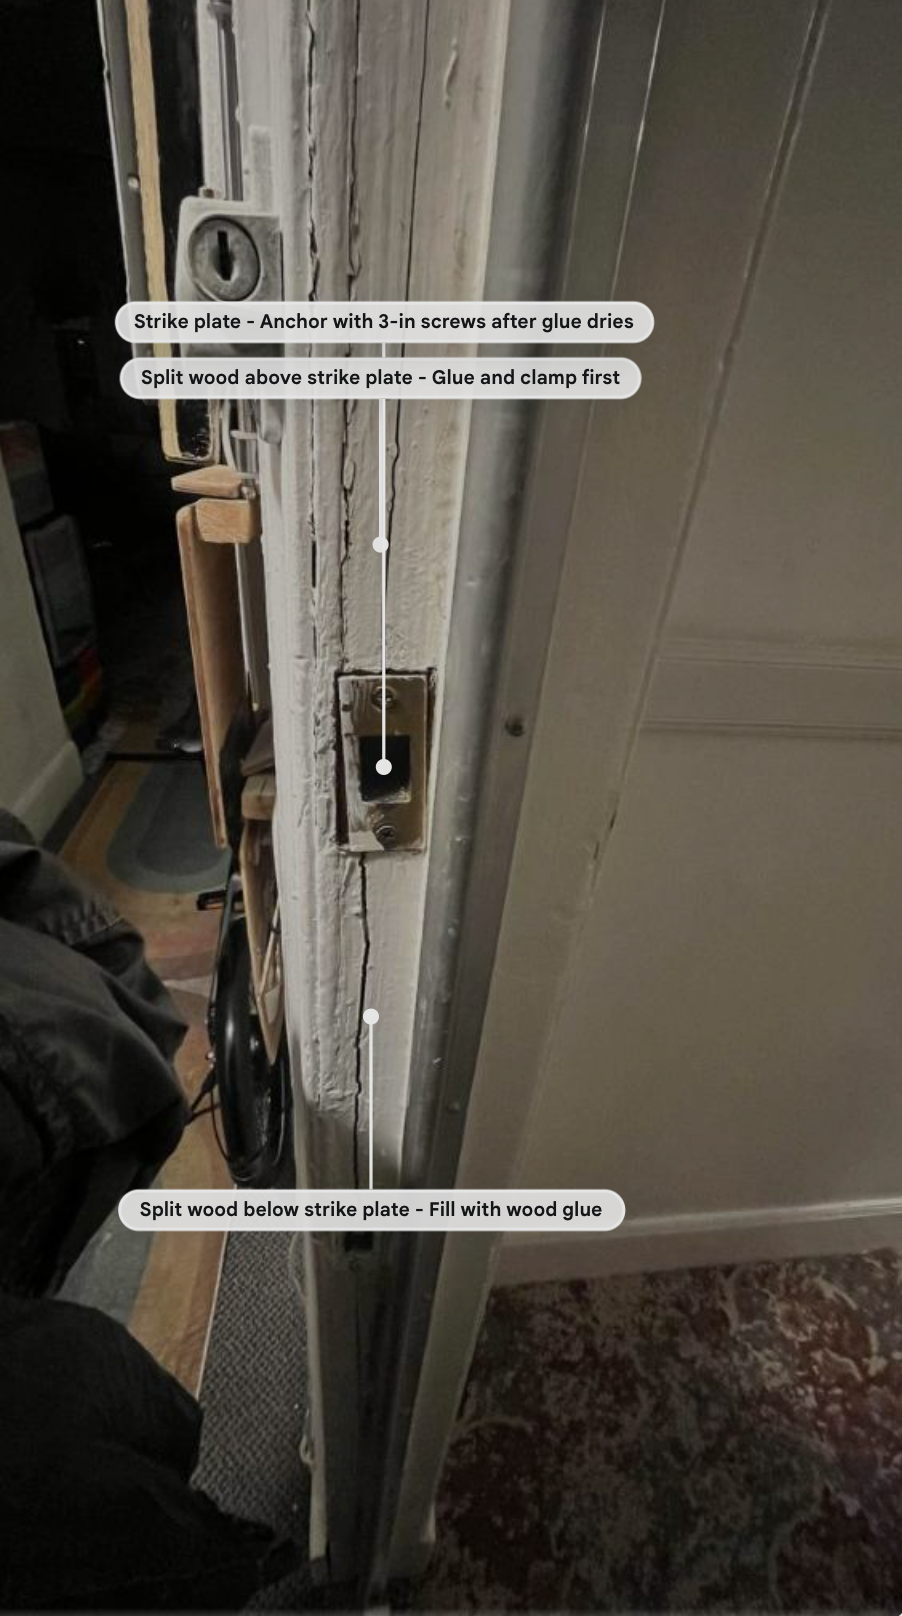
AI-generated image labels are strictly informational and may contain inaccuracies. Learn more
- Step-by-Step Repair & Reinforcement
- Remove the Strike Plate: Unscrew the strike plate (and remove any loose wood splinters inside the crack) so you can access the split cleanly.
- Glue and Clamp the Split Jamb: Work a generous amount of wood glue (such as Titebond II or III) deep into both the upper and lower cracks using a thin putty knife or compressed air. Clamp the jamb tightly shut against the framing—or brace a scrap board across it—and let it cure for 24 hours so the wood fibers bond back together.
- Install a Steel Jamb Reinforcement Plate (Recommended): Because a repaired split is still a weak point on an exterior apartment door, cover the repaired section with a long metal reinforcement plate such as the Prime-Line Jamb Repair and Reinforcement Kit or an 11-inch Door Strike Reinforcement Plate. This bridges across the crack and distributes force over solid wood.
- Pre-Drill & Drive 3-Inch Structural Screws: Once the glue is cured, drill pilot holes through the strike plate (and reinforcement plate) straight into the wall stud behind the jamb. Drive #9 or #10 x 3-inch Torx structural wood screws (usually T25 drive) instead of thin #7 T15 trim screws, and avoid over-torquing so you do not bow the jamb inward.
- Tighten the Rim Lock & Lower Catch: Check the screws on the upper rim-lock keeper and lower catch. If any holes are stripped, glue wooden toothpicks or a 3/8-inch dowel dipped in wood glue into the old holes, let them dry, and re-drive the screws.
- Landlord & Security Note
Because this is an exterior apartment entry door with structural splitting, consider sending this photo to your landlord or property manager. Exterior entry jamb integrity is typically a landlord habitability and security responsibility, and having a documented repair request protects you from being billed for pre-existing or forced-entry frame damage later.
If you'd like help choosing the right hardware, let me know:
- Whether you want a full-length steel reinforcement kit or a compact 7- to 11-inch extended strike plate
- If the door currently rubs or fails to latch when closed
IInitially I thought it was a-ok the door had no issues i twas only when I had a second to LOOK at it that it became clear withat was going on –
It is very common to miss a split jamb at first glance because layers of thick apartment paint often bridge across the crack until you look closely or test the hardware. The door can continue opening and latching normally for months even when the wood behind the strike plate has completely separated.
Why This Happens & What to Watch For
- Paint Masks the Separation: Old coats of interior trim paint hold the split edges together visually, hiding the fact that the strike plate is only anchored into a loose strip of wood.
- False Sense of Latching: Because the latch bolt still clicks into the hole, the door feels shut, even though the frame has lost its resistance against a hard push or impact.
- Hidden Stress on the Rim Lock: Looking closely at the upper rim lock (and the lower catch) in your photo, the split runs right alongside the mounting edge, meaning that lock is also relying on weakened wood.
Best Order of Operations Now That You Caught It
- Take Clear Photos First: Before applying glue or installing hardware, save your close-up photos showing the paint layers inside the crack. If you decide to report it to your landlord—or need proof later that the damage wasn't from normal wear—the paint inside the split clearly shows the crack's history.
- Stabilize Before Upgrading Screws: Even though the door latches fine right now, avoid driving your 3-inch screws in until you have either glued and clamped the split or installed a long steel reinforcement sleeve/plate that wraps or bridges across the cracked wood.
- Check the Door Reveal (Gap): When you close the door, check the vertical gap between the door edge and the jamb. If the gap is tight, avoid surface-mounted wrap-around sleeves that add thickness, and instead use a mortised (recessed) extended strike plate or flat reinforcement plate so the door still closes smoothly without binding.
If you want to make sure the door still closes cleanly after reinforcing it, let me know:
- How wide the gap between the closed door and the jamb is (tight or plenty of room)
- Whether you plan to repair it yourself or notify your landlord first
what is the differene – in installation difficulty and price for a strike plate and doing the whoel side of the door – and consider this palce was buiolt in 1913 so things are oftne nto STANDARD aroudn here.
For a 1913 building, an extended strike plate (7 to 11 inches) is dramatically easier and safer to install than a full-length jamb kit. Old frames from the early 1900s are rarely plumb, almost always have thick layers of paint, and feature custom lock spacing that makes full-length pre-cut kits a major headache.
Extended Strike Plate vs. Full-Length Jamb Reinforcement
| Feature | Extended Strike Plate (7" – 11") | Full-Length Jamb Kit (48" – 60") |
|---|---|---|
| Typical Cost | $10 – $25 | $45 – $90 |
| Installation Time | 20 – 40 minutes (after glue dries) | 1.5 – 3+ hours (often requires trimming) |
| Difficulty Level | Easy to Moderate | Hard (especially in a 1913 building) |
| Fit on 1913 Doors | High (only covers one lock area) | Low (pre-cut holes rarely match old lock spacing) |
| Door Gap Impact | Minimal if mortised or thin-gauge steel | Often causes the door to rub or bind along the edge |
Why a 1913 Frame Makes Full-Length Kits Tricky
- Non-Standard Lock Spacing: Your photo shows a lower mortise latch, a middle strike plate, and an upper surface-mounted rim lock. Full-length reinforcement sleeves have pre-punched cutouts spaced for modern doors, meaning they will almost certainly clash with your 1913 hardware layout unless you cut the steel with an angle grinder.
- Settled & Out-of-Plumb Frames: Over 110+ years, old apartment frames shift slightly. A rigid 5-foot steel channel forces a straight line onto a slightly bowed jamb, creating tight spots where the door refuses to close.
- Thick Paint & Old-Growth Wood: Removing decades of paint across a 5-foot span takes significant scraping. On the plus side, 1913 framing is usually dense old-growth fir or pine, which holds 3-inch screws much better than modern lumber once the crack is glued.
Best Approach for Your 1913 Jamb
- Step 1 — Glue & Clamp the Split: Work wood glue deep into the full length of the vertical crack and clamp or brace it tight for 24 hours. Because old-growth wood fibers are strong, a glued joint is often tougher than the surrounding wood.
- Step 2 — Use a Single Extended Strike Plate (7" to 11"): Mount a heavy-duty extended strike plate (such as a Prime-Line 11-inch Maximum Security Strike Plate or Don-Jo 7-inch Extended Lip Strike) over your main latch. This bridges well above and below the weakest spot without interfering with your upper rim lock or lower catch.
- Step 3 — Watch the Lip Length & Gap: Measure from the center of the screw holes to the edge of the door stop so the metal lip wraps cleanly around the jamb edge without hitting the door. Pre-drill all 3-inch screw holes so you do not split the brittle 1913 wood.
If you want to narrow down the exact plate size, let me know:
- The distance between your main strike plate and the upper rim lock
- Whether you want to recess (mortise) the plate flush with a chisel or surface-mount a thin-gauge plate over the wood
umm – how do I clamp it and shut my door at the same time? or clamp for a few hours then?
You cannot close the door with a regular clamp attached to the jamb, so the easiest approach is to clamp it during the day while you are home (for 2 to 4 hours) or use a door-closed wedging method overnight.
Option 1: Daytime Clamping (Easiest & Cleanest)
You do not actually have to leave clamps on for a full 24 hours.
- Clamp Time: Modern PVA wood glue (like Titebond II or III) reaches strong handling strength in 2 to 4 hours of clamping.
- Curing Time: After 3–4 hours, take the clamps off, wipe away any damp glue squeeze-out, and close your door normally for the night. Wait until the next day (full 24 hours) before drilling or driving your 3-inch screws so the glue reaches 100% strength.
- How to Clamp It: Hook one jaw of a bar clamp (or C-clamp with scrap wood pads) onto the interior casing/trim edge and the other jaw onto the exterior casing/trim edge across the thickness of the wall. Tightening the clamp squeezes the split jamb sandwich-style from front to back.
Option 2: Overnight "Door-Closed" Wedging (If You Can't Leave the Door Open)
If you need to keep the door closed while the glue sets, you can use the closed door itself—or a brace—to apply pressure without blocking the door slab:
- Check Which Way the Crack Pulls: Push on the split wood with your thumb to see which direction closes the gap.
- Lateral Pressure (Sideways): If the split needs to be pushed sideways toward the wall stud, close the door and slide thin wooden shims or folded cardboard into the gap between the door edge and the jamb right at the split. Just make sure the glue does not squeeze out onto the door edge (put a strip of painter's tape or wax paper over the glued crack first).
- Front-to-Back Pressure: If you cannot reach across the whole wall thickness with a clamp, you can temporarily drive 2 or 3 small finish nails or countersunk trim screws diagonally across the crack to pull the wood fibers tight while the glue dries, then putty over them later.
Quick Prep Tip Before Gluing
- Protect the Door: Put a strip of blue painter's tape along the edge of the door and the weatherstripping before you apply glue so stray drips do not glue your door shut.
- Get Glue Deep Into the Crack: Use a thin piece of cardstock, a plastic putty knife, or a disposable syringe to work the wood glue all the way to the back of the split before squeezing it shut.
If you want to make sure your clamp setup will fit your trim, let me know:
- Whether you have bar clamps / C-clamps on hand or need a clamp-free method
- Which direction the crack closes when you press on it (sideways toward the wall or front-to-back across the jamb)
the crack (I just pushed on it) closes cleanly with some pressure from inside the appt and there is a wall acroso from it – so I COULD brce it from indie with soem 2"x2" bracesand really PUSH the crack togtgher. –
Yes, using a 2×2 brace wedged against the opposite hallway wall is a classic carpenter's trick—and since the crack closes cleanly when pushed from inside the apartment, it will work remarkably well without needing specialty clamps.
How to Set Up a 2×2 Wall-to-Jamb Brace Safely
- Protect Both Walls First: Place a flat scrap board (like a short piece of 1×4 or thick cardboard wrapped in a towel) against the opposite apartment wall so the 2×2 does not dent or punch through 1913 plaster/drywall. Place a second scrap wood strip vertically over the glued jamb crack to spread the pressure evenly across the whole split.
- Cut the 2×2 Slightly Long (or Use Shims): Measure the exact distance from the padded opposite wall to the padded jamb, then cut your 2×2 about 1/8 inch shorter and tap wooden door shims (in opposing pairs) between the end of the 2×2 and the wall pad. Shims let you dial in firm, controlled pressure instead of hammering a tight board and risking wall damage.
- Cover the Crack Before Bracing: Put a strip of wax paper, parchment paper, or blue painter's tape over the glued crack before setting the vertical wood pad against it. Otherwise, glue squeezing out of the crack will permanently bond your brace pad to the door jamb.
- Don't Over-Crank the Pressure: You only need enough pressure to close the seam tightly and push a thin bead of glue out along the crack. Pushing too hard can bow the jamb inward or crack old plaster on the opposite wall.
- Hold for 3–4 Hours, Cure for 24: Leave the 2×2 brace wedged in place for 3 to 4 hours while you're home, then remove it so you can close and lock your door for the night. Wait until the next day (24 hours total) before drilling and driving your 3-inch screws.
Quick Check Before You Glue
- Dry-Run the Brace First: Set up the 2×2 brace and shims before putting any glue in the crack to make sure it holds steady, closes the seam cleanly, and doesn't slip.
- Clean Out Loose Paint Chips: Gently scrape away any flaking paint edges right inside the mouth of the crack with a utility knife so the wood fibers meet flush when pressed together.
If you'd like to confirm your final hardware steps for tomorrow once the glue cures, let me know:
Whether you have a drill bit set for pre-drilling into the 1913 wood studs
If you've picked out an extended strike plate or plan to reuse the existing one first
need links to extend strike plates – and I don' have an angle grider – a dremmel?
You do not need an angle grinder—and a Dremel (rotary tool) with a standard fiberglass-reinforced cut-off wheel (like the EZ456) will easily slice through 16- or 18-gauge stamped steel strike plates if you ever need to shorten one. Even better, you can buy a strike plate that already fits between your upper rim lock and lower catch so you don't have to cut any metal at all.
- Best Extended Strike Plates (No Cutting Needed)
Since your 1913 jamb has an upper rim lock above and a small catch below, pick a plate whose height fits cleanly between them:
Single-Latch Long Security Strike (7-7/8" Tall — Best Fit for Your Setup):
- Look at the Prime-Line Maximum Security Deadbolt/Latch Tab Strike (7-7/8" H x 1-1/4" W) or Prime-Line U 10385-L Strikes on Prime-Line Parts.
- It has a single latch cutout in the center and extends roughly 3 inches above and below your strike mortise, letting you drive six 3-inch screws into solid wood well away from the damaged center cutout without hitting your upper rim lock.
Two-Hole Combination Security Strike (11" Tall — Only If Spacing Matches):
- Options like the Prime-Line 11 in. Maximum Security Combination Strike (U 9427) at Home Depot or Prime-Line U 10385 11-in Satin Nickel Combo Strike at Lowe's span 11 inches and bridge across two locks.
- Because your upper lock is a surface-mounted rim lock rather than a modern deadbolt spaced 3-5/8" to 6" away, measure first—an 11-inch plate will likely run into your upper rim lock keeper unless you trim the top with a Dremel.
Wide / Extended-Lip Strike Plates (2-1/4" Tall — If Only the Lip Needs to Wrap Further):
- If you want to keep your existing vertical height (2-1/4") and just wrap further around the thick 1913 jamb edge, look at the Don-Jo Extended Lip Strike Plate (2-1/4" H x 3" W) at Door Locks Direct or Don-Jo EL104 Extended Lip Strike Plate (2-1/4" H x 4" W). These do not add vertical screw reinforcement above/below the crack, so they work best after your glue repair is fully cured.
Using a Dremel vs. Simple Hand Tools
- With a Dremel: If a 7-7/8" plate is 1 inch too tall for the space between your locks, clamp the plate to a scrap board, mark a line, and cut it with a Dremel fiberglass cut-off wheel (wear eye protection, as sparks fly). Smooth the cut edge with a grinding stone or metal file in 30 seconds.
- Without Any Metal Cutting (Wood Mortising): To recess a taller strike plate flush into the jamb so the door doesn't rub, score the outline with a utility knife and pare out 1/16 inch of wood/paint with a 1/2-inch wood chisel (or even a sharp flathead screwdriver in a pinch).
If you measure the clear vertical space above and below your current strike plate (between the upper rim lock and lower catch), I can tell you the exact plate height that will drop in with zero cutting.
